Setting up a robust developer or systems administration workstation often requires working across both native Windows (PowerShell) and a Linux subsystem (WSL). Because version control coordinates configurations, automation scripts, and application source code, having Git installed and configured correctly in both environments is a fundamental prerequisite.
Without deliberate setup, administrators frequently encounter annoying friction: entering GitHub or GitLab personal access tokens repeatedly inside WSL, running into permission errors on cross-mounted drives (/mnt/c/), or corrupting shell scripts because Windows inserted carriage return (CRLF) line endings into bash scripts.
This practical guide walks through installing Git on Windows using modern automated tools (winget), setting up Git on Linux within WSL, bridging Git Credential Manager across boundaries, and mastering the essential daily Git commands required for everyday operations.
Quick answer
To install Git on Windows, open an elevated PowerShell prompt and run:
winget install --id Git.Git -e --source wingetTo install Git inside an Ubuntu WSL instance, open your Linux terminal and execute:
sudo apt update && sudo apt install -y gitAfter installation, set your global identity and default branch in both shells:
git config --global user.name "Your Name"
git config --global user.email "[email protected]"
git config --global init.defaultBranch main
To avoid retyping authentication tokens in WSL, configure WSL to use the Windows Git Credential Manager executable:
git config --global credential.helper "/mnt/c/Program\ Files/Git/mingw64/bin/git-credential-manager.exe"Prerequisites and Architecture Considerations
Before deploying Git, consider where your source files will live:
- Windows Native Repositories: Stored under Windows NTFS drives (such as
C:\Projects\orC:\Users\<User>\Source). These are accessed natively through Windows PowerShell, PowerShell 7, or VS Code. - WSL Linux Repositories: Stored within the Linux ext4 filesystem (such as
/home/<user>/project/). Linux-native tools, compilers, and Docker run significantly faster here than on 9P/Plan9 Windows mount paths (/mnt/c/).
For the best experience, install Git in both environments. Windows PowerShell uses the Windows binary (git.exe), while WSL bash uses the native ELF Linux binary (/usr/bin/git). By sharing Git Credential Manager between them, you authenticate once in Windows and enjoy seamless GitHub or GitLab access in both environments.
How to Install Git on Windows with Winget and the Official Installer
There are two primary ways to install Git on Windows: using the Windows Package Manager (winget) or the interactive installer.
Method 1: Automated Installation with Winget (Recommended)
The fastest and most reproducible method is using Microsoft’s official Windows Package Manager (winget). It downloads the official release, validates the SHA256 checksum, and performs an unattended installation without clicking through 15 wizard pages.
Open PowerShell as Administrator or a standard user with install rights, then execute:
winget install --id Git.Git -e --source wingetThe installer will register Git under C:\Program Files\Git\ and add git.exe to your machine’s system PATH.
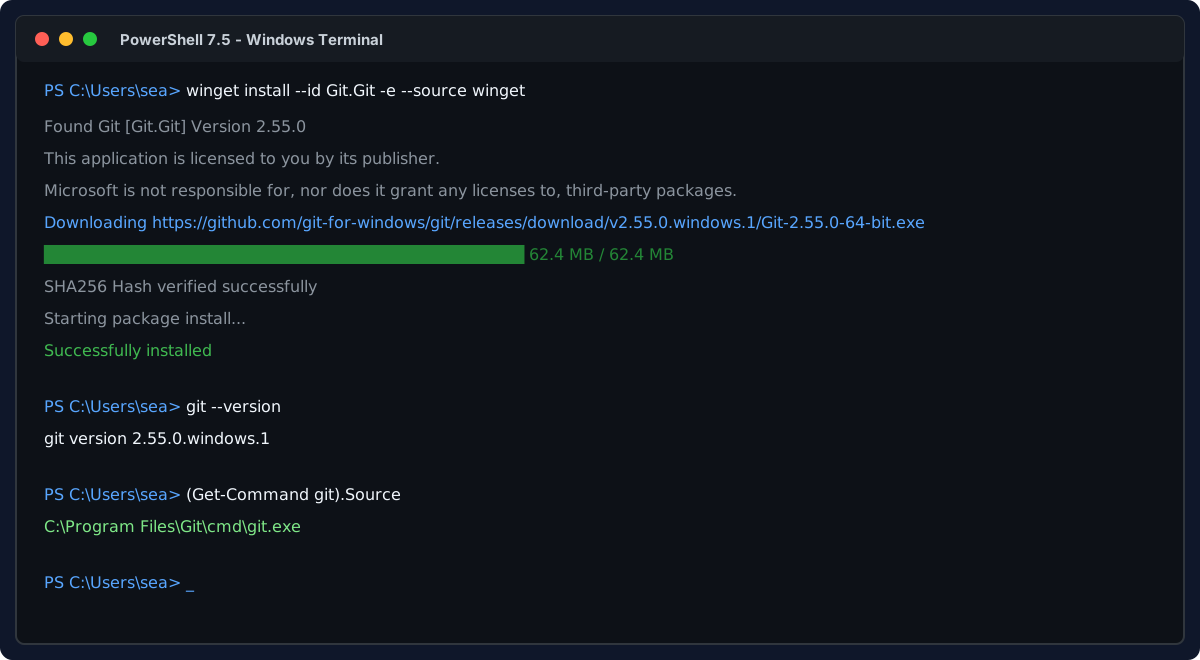
Windows Terminal showing an unattended Git installation via winget and subsequent version verification.
After the installation finishes, open a fresh PowerShell window to reload your session’s environment variables, and verify that the executable is accessible:
git --version
(Get-Command git).Source
Expected output:
git version 2.55.0.windows.1
C:\Program Files\Git\cmd\git.exe
Method 2: Interactive Git for Windows Installer
If you require customized context menu entries or a specific shell integration, download the installer directly from the official Git for Windows project.
When stepping through the installer wizard, pay close attention to these critical settings:
- Default Editor: Choose your preferred editor. Visual Studio Code is recommended for most administrators (
Use Visual Studio Code as Git's default editor). - Adjusting your PATH environment: Select Git from the command line and also from 3rd-party software. This ensures
git.exeis available to PowerShell, Command Prompt, and Windows Terminal. - Line ending conversions: Select Checkout Windows-style, commit Unix-style line endings (
core.autocrlf = true). This keeps Windows text readable locally while ensuring files pushed to shared repositories retain Linux-standard line feeds (LF). - Credential helper: Ensure Git Credential Manager is checked. This enables modern OAuth, two-factor authentication, and secure token caching in the Windows Credential Store.
How to Install Git on Linux and Ubuntu WSL
Every major Linux distribution provides Git in its standard package repositories. In WSL (Ubuntu / Debian), you should install the native Linux package rather than calling git.exe across the boundary.
Installing Git via APT on Ubuntu / Debian WSL
Launch your WSL terminal (e.g., wsl -d Ubuntu-26.04 or simply wsl) and run the package update and installation commands:
sudo apt update
sudo apt install -y git
Verify that the Linux Git binary is installed and check its location:
git --version
which git
Expected output:
git version 2.53.0
/usr/bin/git
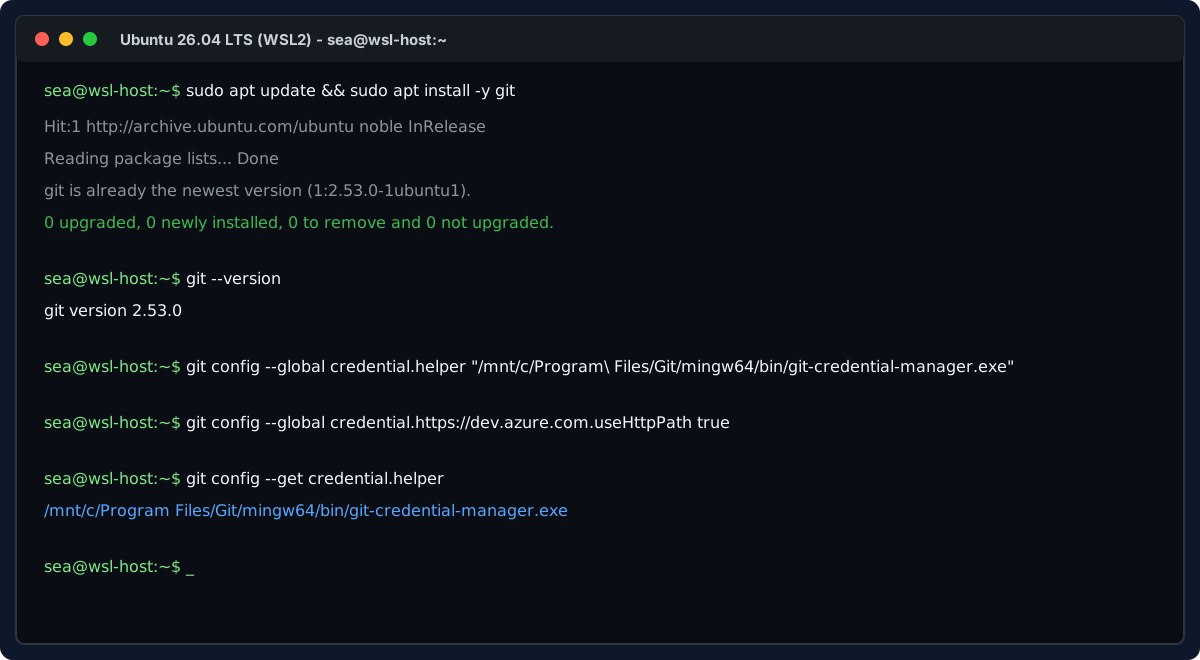
Ubuntu WSL terminal showing Git package installation and credential helper linking.
Installing on Other Linux Distributions
If you run non-Debian distributions in WSL or on dedicated Linux servers:
- Fedora / RHEL / Rocky Linux:
sudo dnf install -y git - Arch Linux:
sudo pacman -S --noconfirm git
Configuring User Identity and Line Endings across Environments
Once Git is installed, configure your user details. Git stamps your name and email onto every commit you create.
Setting Identity and Default Branch
Run these commands in both Windows PowerShell and WSL bash:
git config --global user.name "John Doe"
git config --global user.email "[email protected]"
git config --global init.defaultBranch main
To confirm your configuration:
git config --global --listManaging Line Endings (CRLF vs LF)
Cross-platform development between Windows and Linux is vulnerable to line-ending discrepancies. Windows uses Carriage Return + Line Feed (\r\n or CRLF), while Linux and macOS use Line Feed (\n or LF). If a bash script is saved with CRLF, running it in Linux produces baffling errors like /bin/bash^M: bad interpreter.
Configure each environment appropriately:
-
On Windows (PowerShell):
Explanation: Git convertsgit config --global core.autocrlf trueLFtoCRLFwhen checking out files onto your Windows disk, and automatically convertsCRLFback toLFwhen committing to the repository. -
In Linux / WSL (Bash):
Explanation: Git does not modify line endings on checkout (keeping nativegit config --global core.autocrlf inputLFon Linux), but ensures any strayCRLFendings are converted toLFupon commit.
Configuring Git Credential Manager for Cross-Environment Authentication
When authenticating against GitHub, Azure DevOps, or GitLab over HTTPS, modern systems require Multi-Factor Authentication (MFA) or personal access tokens. Git for Windows includes Git Credential Manager (GCM), which integrates directly with the Windows Credential Manager to store authentication tokens securely.
You do not need to create and manage separate SSH keys or personal access tokens for WSL. You can instruct WSL’s native Linux Git to delegate authentication to the Windows Git Credential Manager executable located on your C: drive.
Inside your WSL Linux terminal, execute:
git config --global credential.helper "/mnt/c/Program\ Files/Git/mingw64/bin/git-credential-manager.exe"If you work with Azure DevOps repositories, also set the HTTP path flag:
git config --global credential.https://dev.azure.com.useHttpPath trueWhen you run git clone, git fetch, or git push over HTTPS from inside WSL, a Windows authentication browser window will open. Once verified, the token is saved into Windows Credential Manager and shared automatically across both Windows and WSL.
Essential Daily Git Commands: Practical Walkthrough
With Git properly installed and configured, you are ready to manage repositories. Git workflows revolve around four key areas: the Working Directory, the Staging Area (Index), the Local Repository (.git), and Remote Repositories (such as GitHub).

Git command lifecycle showing transitions between Working Directory, Staging Area, Local Repository, and Remote.
Here is a practical breakdown of the seven core Git commands you will use daily.
1. git clone: Downloading an Existing Repository
To clone a remote repository to your local drive:
git clone https://github.com/username/project.git
cd project
If you only need the latest history for a quick build or script execution and want to save disk space and bandwidth, use a shallow clone:
git clone --depth 1 https://github.com/username/project.git2. git status and git add: Staging Changes
When you edit or create files, Git tracks them in your Working Directory as modified or untracked. To inspect the current state:
git statusTo stage files (copy them into the Staging Area / Index ready for commit):
- Stage a specific file:
git add deploy-script.ps1 - Stage all modified and new files in the current folder:
git add . - Review staged differences before committing:
git diff --staged
3. git commit: Recording Snapshots to Local History
A commit records the staged snapshot into your local repository history. Always supply an informative, descriptive message:
git commit -m "fix: update network share timeout parameter in backup script"To stage all modified tracked files and commit in a single step (skipping untracked new files):
git commit -am "chore: refine log formatting"To view your recent commit history:
git log --oneline -n 54. git branch: Organizing Independent Work
Branches allow you to develop new features or test bug fixes in isolation without affecting the stable main branch.
- List all local branches:
git branch - List both local and remote tracking branches:
git branch -a - Create a new branch called
feature/ad-sync:git branch feature/ad-sync - Delete a branch that has already been merged:
git branch -d feature/ad-sync
5. git checkout and git switch: Moving Between Branches
Historically, git checkout was used for both switching branches and restoring files. In modern Git (version 2.23+), the clearer git switch command is preferred for branch navigation.
- Switch to an existing branch:
(Traditional equivalent:
git switch feature/ad-syncgit checkout feature/ad-sync) - Create and immediately switch to a new branch in one command:
(Traditional equivalent:
git switch -c feature/backup-retentiongit checkout -b feature/backup-retention) - Switch back to the previous branch:
git switch -
6. git pull: Synchronizing Remote Changes
To download changes from the remote server and merge them into your current local branch:
git pull origin maingit pull is actually a combination of two commands: git fetch (download new commits from the remote repository without altering your local files) followed by git merge (combining the remote branch into your current branch).
To keep your local commit history linear without messy merge commits, configure pull to rebase:
git pull --rebase origin main7. git push: Publishing Local Commits to Remote
Once you have committed your changes locally, upload them to the remote repository:
- First push of a newly created branch (sets up upstream tracking):
git push -u origin feature/ad-sync - Subsequent pushes on a tracking branch:
git push
The -u (or --set-upstream) flag links your local branch with the remote counterpart so future git push and git pull commands work without specifying the remote name and branch.
Troubleshooting Common Windows and WSL Git Pitfalls
Issue 1: “fatal: detected dubious ownership in repository”
Symptom: When running Git commands in WSL inside a Windows folder (such as /mnt/c/Users/...), Git halts with:
fatal: detected dubious ownership in repository at '/mnt/c/Projects/myapp'
Cause: Git includes security protections against running commands inside directories owned by a different user. Under WSL, Windows NTFS files belong to the Windows user ID, which does not match your Linux user UID.
Resolution: Add the directory (or all safe directories) to your global safe directory list inside WSL:
git config --global --add safe.directory /mnt/c/Projects/myappOr trust all repositories if this is an isolated single-user admin workstation:
git config --global --add safe.directory "*"Issue 2: Bash Scripts Failing with Carriage Returns (^M)
Symptom: Running a script in Linux or Docker fails with syntax error near unexpected token or /bin/sh^M: bad interpreter.
Cause: The script was created on Windows with CRLF line endings and committed without proper conversion.
Resolution: In your repository root, add a .gitattributes file to enforce Linux line feeds for shell scripts:
* text=auto
*.sh text eol=lf
*.ps1 text eol=crlf
Then normalize existing files in the repository:
git add --renormalize .
git commit -m "style: enforce LF on shell scripts via .gitattributes"
Issue 3: Git Credential Manager Prompts Fail in Headless or SSH Sessions
Symptom: Git hangs or throws cannot open display when attempting to push or pull over HTTPS from an SSH session into a Linux/WSL box.
Cause: The GUI-based Windows Git Credential Manager cannot display a graphical browser window in a headless SSH session.
Resolution: For headless servers or automation tasks, use an SSH key pair or a dedicated GitHub Personal Access Token (PAT). Generate an SSH key and upload the public key (~/.ssh/id_ed25519.pub) to your repository provider:
ssh-keygen -t ed25519 -C "[email protected]"
cat ~/.ssh/id_ed25519.pub
Then clone using SSH syntax:
git clone [email protected]:username/project.gitSummary and Verification Checklist
| Operational Requirement | Windows Environment | Linux / WSL Environment |
|---|---|---|
| Package Manager Command | winget install --id Git.Git -e |
sudo apt update && sudo apt install -y git |
| Verify Installation | git --version |
git --version |
| Line Ending Standard | core.autocrlf = true |
core.autocrlf = input |
| Credential Storage | Windows Credential Manager | Delegated to git-credential-manager.exe |
| Branch Switching | git switch <branch> |
git switch <branch> |
| Repository Sync | git pull --rebase / git push |
git pull --rebase / git push |
Having Git properly installed in both Windows and WSL eliminates cross-platform friction and enables seamless automation scripts, module versioning, and daily development workflows.
💬 Comments