For many system administrators, version control began as a folder full of scripts named backup-script-v1.ps1, backup-script-v2-final.ps1, and backup-script-v2-final-REALLYFINAL.ps1. Moving to Git solved local versioning, but modern IT operations require central collaboration, peer review, backup, and automated deployment. This is where GitHub becomes indispensable.
GitHub transforms isolated scripts on administrator laptops into structured, collaborative infrastructure. Whether you manage PowerShell modules, Terraform definitions, Docker containers, or static documentation sites, understanding how GitHub works—and how to interact with it securely—is essential.
This guide provides an end-to-end operational walkthrough of GitHub: understanding the platform, setting up required multi-factor authentication (2FA), configuring secure token and credential access, utilizing GitHub Projects and Gists, cloning and pushing code, and executing standard Pull Request (PR) review and merge cycles.
Quick answer
To use GitHub effectively with local Git:
- Sign up and enforce 2FA: Create an account at
github.com/signupand immediately enable an Authenticator App (TOTP) under Settings → Password and authentication. - Authenticate securely: GitHub disallows account passwords for Git CLI commands. Use Git Credential Manager (GCM) for seamless browser-based OAuth login, or generate a Personal Access Token (PAT) under Settings → Developer Settings → Personal access tokens.
- Daily workflow cycle:
- Clone repository:
git clone https://github.com/owner/repo.git - Create feature branch:
git switch -c feature/my-patch - Stage & commit:
git add . && git commit -m "fix: update parameter" - Push to GitHub:
git push -u origin feature/my-patch - Open Pull Request on GitHub, review diffs, and click Squash and merge.
- Pull merged changes back to local main:
git switch main && git pull origin main.
- Clone repository:
What is GitHub and Why System Administrators Need It
It is common for newcomers to confuse Git with GitHub. Keeping the distinction clear is fundamental:
- Git is the distributed version control software running locally on your computer (Windows, Linux, or macOS). It tracks changes in files, maintains a commit history, and manages branches on your local disk.
- GitHub is a cloud-hosted platform built on top of Git. It hosts remote copies of your Git repositories and provides web-based tools for code review, issue tracking, project boards, wiki documentation, and CI/CD pipelines (GitHub Actions).
Why IT Professionals Use GitHub
- Central Backup and Single Source of Truth: Your automation scripts and system configuration templates are safely stored off local workstations, preventing loss when a laptop fails.
- Auditing and Accountability: Every line of code, change, and deletion is timestamped and attributed to a specific user. When an automation script causes an outage,
git blameand commit logs show exactly what changed, why, and when. - Change Control and Code Review: Administrators no longer edit production scripts directly on a domain controller or jump box. Changes are submitted through Pull Requests, tested by team members, and merged only after approval.
- Automated Validation (CI/CD): With GitHub Actions, pushing code can automatically trigger Pester syntax tests on PowerShell scripts, validate JSON/YAML configuration syntax, or build and deploy static websites to hosting providers like Cloudflare Pages.
Registering an Account and Account Security
Getting started requires creating an account on the official platform:
- Visit github.com/signup.
- Enter your work or primary administrator email address.
- Choose a strong, unique passphrase (managed via your enterprise password manager).
- Enter a professional username (e.g.,
firstname-lastnameor your corporate handle). - Verify your email address by submitting the verification code sent to your inbox.
For individual sysadmins and internal teams, the GitHub Free plan includes unlimited public and private repositories, automated security alerts, and generous GitHub Actions automation minutes.
Configuring Authentication: 2FA and Access Tokens
Securing your GitHub account and configuring authentication between your local terminal and GitHub’s servers is the most critical setup step.
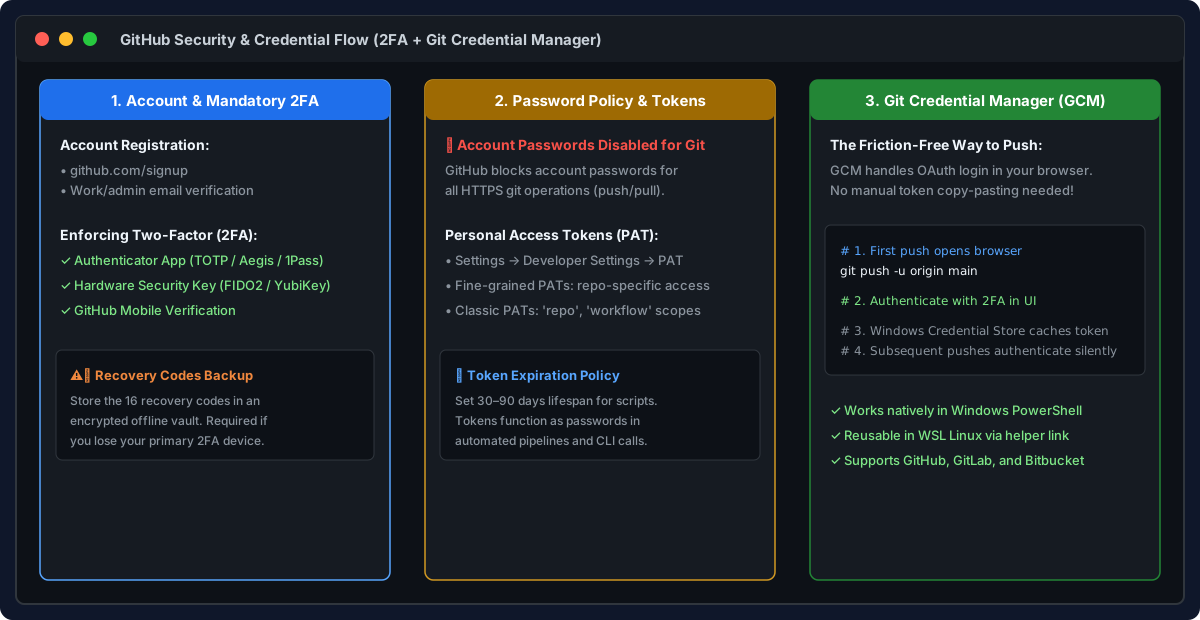
Architecture of GitHub authentication: enforcing 2FA, token policies, and automated OAuth via Git Credential Manager.
Enforcing Two-Factor Authentication (2FA)
GitHub mandates Two-Factor Authentication for all accounts contributing code. Without 2FA enabled, account capabilities become restricted.
- Click your profile avatar in the upper right corner and select Settings.
- In the left navigation, click Password and authentication.
- Under Two-factor authentication, click Enable two-factor authentication.
- Select Set up using an authenticator app.
- Scan the QR code using an enterprise authenticator (such as 1Password, Bitwarden, Microsoft Authenticator, or Aegis).
- Enter the 6-digit confirmation code generated by your app.
- Download Recovery Codes: GitHub displays 16 recovery codes. Save these in an encrypted password vault. If your phone or hardware key is lost, recovery codes are the only way to regain access to your account.
Why Account Passwords Cannot Be Used for Git Push
In August 2021, GitHub permanently discontinued account password authentication for all Git operations (push, pull, clone over HTTPS). If you run git push and enter your GitHub account password, the operation will fail with:
remote: Support for password authentication was removed on August 13, 2021.
fatal: Authentication failed for 'https://github.com/username/repo.git/'
To authenticate Git from PowerShell, Windows Terminal, or WSL, you must use one of two modern mechanisms: Git Credential Manager or a Personal Access Token (PAT).
Method 1: Git Credential Manager (Recommended for Interactive Workstations)
If you installed Git on Windows via winget install --id Git.Git -e, Git Credential Manager (GCM) is already installed.
When you run your first git push or git clone against a private GitHub repository:
git push -u origin mainA graphical browser popup will appear titled “Connect to GitHub”. Click Sign in with your browser, complete your standard GitHub login and 2FA prompt, and authorize Git Credential Manager. GCM automatically generates an OAuth token, stores it securely inside the Windows Credential Manager, and refreshes it in the background. You will never have to copy-paste passwords or tokens manually.
Method 2: Personal Access Tokens (Required for Scripts, Headless Servers, and CI/CD)
If you run Git commands inside automated scripts, container pipelines, or headless Linux servers where no browser window can open, you must generate a Personal Access Token (PAT).
- On GitHub, navigate to Settings → Developer settings → Personal access tokens.
- Choose Fine-grained tokens (recommended for restricting access to specific repositories) or Tokens (classic).
- If using Classic: click Generate new token (classic).
- Give the token a descriptive name (e.g.,
JumpBox-Automation-Script). - Set an expiration date (e.g., 30 or 90 days; avoid indefinite expiration).
- Select scopes: For daily admin work, check
repo(full control of private repositories) and optionallyworkflow. - Click Generate token.
- Copy the token immediately (it begins with
ghp_). GitHub will never show it to you again.
When Git prompts you for your password on the command line:
Username for 'https://github.com': your-github-username
Password for 'https://[email protected]': <PASTE-YOUR-TOKEN-HERE>
Creating and Initializing a New GitHub Repository
A repository (or “repo”) is the central project folder containing all your files, scripts, and their complete revision history.
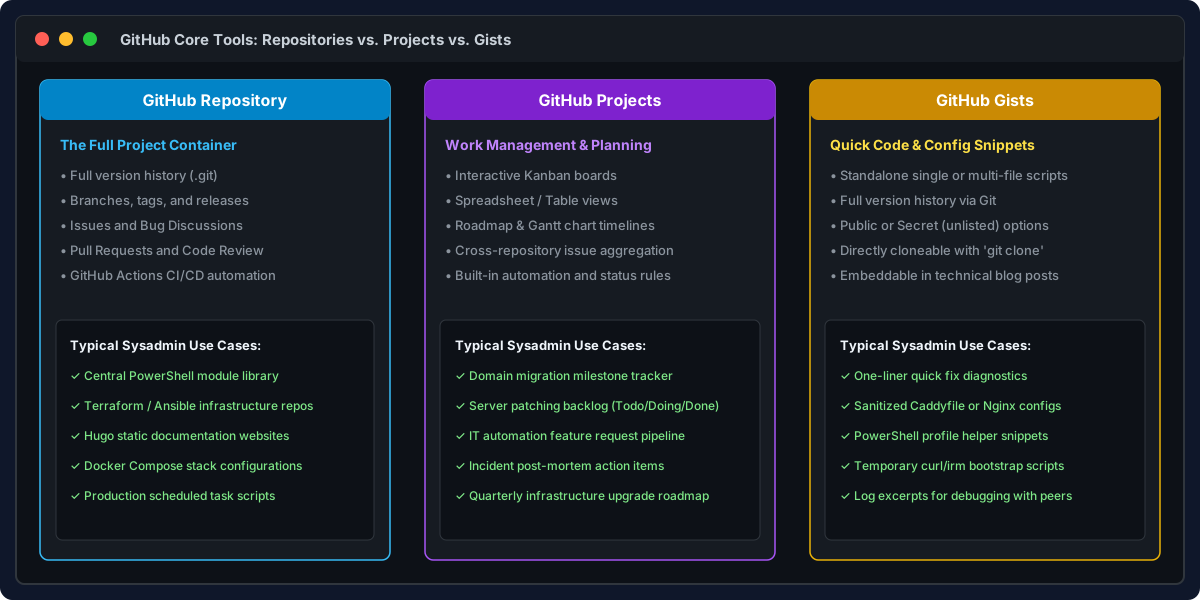
Comparison of GitHub core features: Repositories (code), Projects (planning), and Gists (quick scripts).
Creating a Repository via Web UI
- On GitHub, click the
+icon in the top navigation bar and select New repository. - Repository name: Use concise, hyphenated lowercase names (e.g.,
ad-powershell-toolkitorhyperv-backup-scripts). - Visibility:
- Private: Accessible only to you and explicitly invited team members. Recommended for internal company scripts, server tooling, and operational code.
- Public: Accessible to anyone on the internet. Use only for open-source utilities containing zero internal server names, internal IP addresses, or secrets.
- Initialization options:
- Check Add a README file (creates a landing page explaining the repository).
- Add .gitignore: Select the PowerShell or Windows template to automatically ignore temporary files, event logs, and transcript logs.
- Choose a license: MIT or Apache 2.0 if public; None for proprietary internal work.
- Click Create repository.
Connecting an Existing Local Folder to a New GitHub Repo
If you already have a folder of scripts on your local drive and want to publish it to a blank GitHub repository:
Open PowerShell, navigate to your local folder, and run:
# Initialize local Git repository if not already done
git init -b main

# Stage and commit your files
git add .
git commit -m "feat: initial commit of system administration scripts"

# Link your local repo to GitHub
git remote add origin https://github.com/your-username/ad-powershell-toolkit.git

# Push your code to GitHub
git push -u origin main
Managing Work with GitHub Projects
Beyond hosting code, GitHub provides GitHub Projects—a built-in project management and task tracking application directly integrated with your issues and pull requests.
Key Capabilities of GitHub Projects
- Kanban Boards: Classic visual boards organized into columns such as
Todo,In Progress,Under Review, andDone. - Table & Spreadsheet Views: Ideal for sorting issues by priority, assigned administrator, server environment, or target completion date.
- Roadmaps: Timeline-based views for mapping out quarterly infrastructure migrations, domain controller upgrades, or patching cycles.
- Cross-Repository Tracking: A single project board can pull issues and pull requests across multiple repositories (e.g., tracking a company-wide Windows 11 upgrade across deployment scripts, policy repos, and documentation).
How Administrators Use GitHub Projects
- Navigate to your organization or user profile and select the Projects tab.
- Click New project and select the Board template.
- Create task cards for operational milestones:
- “Audit active domain administrator service accounts”
- “Migrate print server scripts to PowerShell 7”
- “Implement TLS 1.3 enforcement script”
- When work begins on a task, drag the card from
TodotoIn Progress. When the corresponding Pull Request merges, GitHub automation automatically moves the card toDone.
Sharing Quick Scripts with GitHub Gists
Not every piece of code warrants a full Git repository with branches and CI/CD pipelines. For one-off diagnostic scripts, configuration templates, or bug reproduction snippets, use GitHub Gists (gist.github.com).
Core Features of Gists
- Full Git Versioning: Every Gist is a real Git repository behind the scenes. You can clone it, commit updates, and review revisions.
- Public vs. Secret:
- Public Gists: Searchable via search engines and listed in your public profile.
- Secret Gists: Not searchable or indexed, but accessible to anyone with the direct URL. (Warning: Secret does not mean encrypted or password-protected; never store passwords or production credentials in a Secret Gist).
- Multi-File Support: A single Gist can hold multiple related files (e.g.,
Install-Module.ps1,Config.json, andREADME.md).
Creating and Cloning a Gist
- Go to gist.github.com.
- Enter a description:
Active Directory Stale Computer Account Cleanup. - Set the filename:
Cleanup-StaleComputers.ps1. - Paste your PowerShell script.
- Click Create public gist or Create secret gist.
To clone and edit the gist locally with Git:
git clone https://gist.github.com/your-username/gist-id-hash.gitEnd-to-End Workflow: Clone, Modify, Commit, and Push
Here is the fundamental, day-to-day loop for pulling an existing repository down to your workstation, making edits, and publishing changes back to GitHub.
Step 1: Clone the Repository to Local Disk
Open your terminal (PowerShell on Windows or Bash in WSL) and clone the repository:
git clone https://github.com/your-username/network-monitoring-tools.git
cd network-monitoring-tools
Step 2: Create an Isolated Branch
Never commit directly to the main branch. Creating a dedicated branch isolates your changes and makes review straightforward:
git switch -c feature/add-port-scannerStep 3: Make Your Code Changes
Add or modify scripts using your editor (e.g., code . for Visual Studio Code). For example, create a new script Test-PortConnectivity.ps1.
Step 4: Check Status and Stage Files
Verify what files have been changed or added:
git statusStage the modified files:
git add Test-PortConnectivity.ps1Step 5: Commit Your Changes
Create a snapshot with a clean, descriptive commit message:
git commit -m "feat: add multi-threaded port connectivity testing script"Step 6: Push the Branch to GitHub
Publish your local branch to the remote GitHub repository:
git push -u origin feature/add-port-scannerOnce pushed, Git will print a direct URL in your terminal allowing you to open a Pull Request immediately:
Total 3 (delta 1), reused 0 (delta 0), pack-reused 0
remote: Create a pull request for 'feature/add-port-scanner' on GitHub by visiting:
remote:      https://github.com/your-username/network-monitoring-tools/pull/new/feature/add-port-scanner
Pull Requests: Opening, Reviewing, and Merging Code
A Pull Request (PR) is a formal proposal to merge code from a feature branch into the stable main branch. It provides a collaborative web interface where team members discuss modifications, review code line-by-line, and verify that automated tests pass.
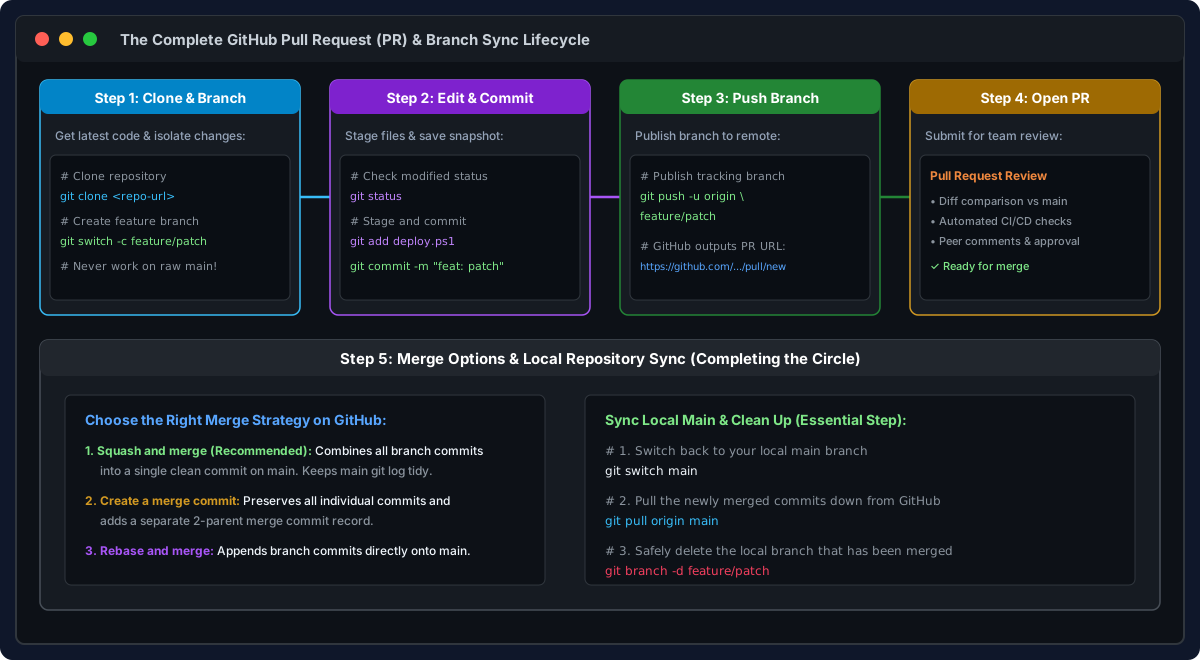
The complete GitHub Pull Request lifecycle: from local feature branch to web review, merge options, and local branch cleanup.
Opening a Pull Request
- Visit the repository page on GitHub. A yellow notification banner will appear: “feature/add-port-scanner had recent pushes… Compare & pull request”. Click that button.
- Ensure the base branch is
mainand the compare branch isfeature/add-port-scanner. - Provide a clear title and description:
- What changed: Summarize the scripts added or modified.
- Why: Reference the operational ticket or problem solved.
- Testing done: Confirm the script was tested against a staging or lab environment.
- Click Create pull request.
Conducting Code Review
On the PR page, click the Files changed tab:
- Green highlighted lines indicate added code; red indicates deleted code.
- Hover over any line number and click the blue
+icon to leave inline comments or request changes from colleagues. - If GitHub Actions CI is enabled, green checkmarks verify that script analysis, syntax linters, and unit tests have passed.
The 3 Merge Strategies Explained
Once review is complete, click the merge dropdown on GitHub. Understanding which strategy to choose prevents cluttered Git histories:
| Merge Strategy | How It Works | Sysadmin Best Practice |
|---|---|---|
| Squash and merge | Combines all commits on the branch into one single clean commit on main. |
Recommended. Hides messy intermediate commits (e.g. “typo fix”, “test 2”) and keeps main history clean. |
| Create a merge commit | Preserves every individual branch commit and adds a separate 2-parent merge commit record. | Use when preserving individual historical commits on major release branches is mandatory. |
| Rebase and merge | Re-applies individual branch commits directly on top of main without a merge commit. |
Creates a linear history, but keeps all individual commit records. |
Click Confirm squash and merge, then click Delete branch on GitHub to keep your repository tidy.
Completing the Circle: Syncing Local Main
After merging on GitHub, your remote main branch contains new code that your local computer does not have yet. You must pull these updates and delete your stale local branch:
# Switch back to local main
git switch main

# Pull down the newly merged code from GitHub
git pull origin main

# Delete the local feature branch that is now merged
git branch -d feature/add-port-scanner
Common GitHub Pitfalls and Troubleshooting
1. Accidentally Pushing Secrets or Credentials
The Trap: Committing a script containing hardcoded Active Directory passwords, API tokens, or tenant IDs.
The Fix:
- Never commit raw credentials. Use environment variables, Azure Key Vault, or PowerShell SecretManagement modules.
- In your repository root, ensure
.gitignoreexcludes sensitive files:*.env *.credential appsettings.Production.json secrets/ - Enable GitHub Secret Scanning under Settings → Code security and analysis. GitHub will immediately block pushes containing known credential patterns.
2. “Updates were rejected because the remote contains work”
Symptom: Running git push fails with:
error: failed to push some refs to 'https://github.com/user/repo.git'
hint: Updates were rejected because the remote contains work that you do not have locally.
Resolution: Another administrator (or a previous PR merge) pushed changes to the remote branch while you were working. Incorporate their updates using rebase before pushing:
git pull --rebase origin main
git push origin main
3. Permission Denied (publickey) Over SSH
Symptom: Cloning with [email protected]:... fails with:
[email protected]: Permission denied (publickey).
fatal: Could not read from remote repository.
Resolution: You have not added your computer’s public SSH key to your GitHub profile. Generate an ed25519 key pair, copy the public key, and add it under Settings → SSH and GPG keys:
ssh-keygen -t ed25519 -C "[email protected]"
cat ~/.ssh/id_ed25519.pub
Summary Checklist
| Objective | Recommended Tool / Command | Purpose |
|---|---|---|
| Account Protection | Authenticator App (TOTP) + Recovery Codes | Mandatory 2FA for account safety |
| Workstation Auth | Git Credential Manager | Frictionless OAuth login via browser |
| Script Automation Auth | Fine-grained Personal Access Token (PAT) | Headless HTTPS authentication |
| Start New Feature | git switch -c feature/<name> |
Isolate code from main |
| Publish Work | git push -u origin <branch> |
Upload branch for Pull Request review |
| Integrate Code | GitHub PR → Squash and merge | Maintain clean, auditable main history |
| Local Sync | git switch main && git pull origin main |
Keep workstation aligned with production |
Embracing GitHub transforms administrative scripting into structured, reliable, and auditable software operations.
💬 Comments