When an IT department transitions from individual administrators writing scripts on isolated workstations to a collaborative engineering team, managing access on a per-person basis quickly becomes unmaintainable. An administrator leaves the company, and their individual account must be manually unlinked from dozens of repositories; a new engineer joins, and someone spends hours granting them access one repository at a time.
GitHub solves this organizational sprawl through GitHub Organizations and Teams. Teams allow leads to implement role-based access control (RBAC), enforce security boundaries, automate code reviews, and maintain a clear audit trail across shared infrastructure code, PowerShell modules, and deployment templates.
This comprehensive guide details how to structure a GitHub Organization, configure member roles, grant teams granular repository access, establish branch protection rules, automate code ownership with CODEOWNERS, and manage team sprint backlogs using GitHub Projects.
Quick answer
To create and manage a team on GitHub:
- Create an Organization: In GitHub, click your profile avatar → Your organizations → New organization (the free plan includes unlimited teams and private repos).
- Create a Team: Open your organization page → click the Teams tab → click New team (e.g.,
@enterprise-it/sysadmins). - Add Members: Invite colleagues to the organization and assign them to the team as Members or Maintainers.
- Grant Repository Access: In team settings, select Repositories → Add repository → choose the appropriate permission (typically Write for contributors, Admin for leads).
- Protect the Main Branch: In repository settings, add a Branch Protection rule on
main: require a Pull Request with at least 1 approval, require passing CI checks, and disallow force pushes. - Automate Reviews: Add a
.github/CODEOWNERSfile specifying@organization/team-nameto automatically request team reviews on all incoming PRs.
Understanding GitHub Member and Repository Roles
Configuring team security requires understanding the distinction between Organization-level roles, Team-level roles, and Repository-level permissions.
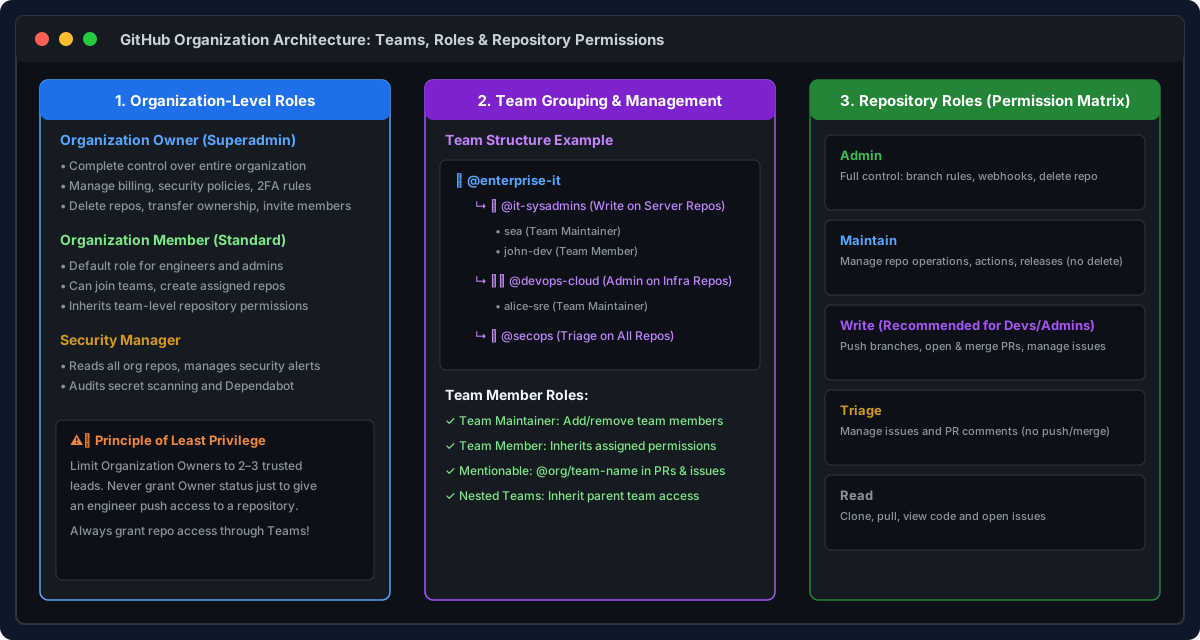
Hierarchy of GitHub roles: from Organization superadmins to Teams and granular Repository permission levels.
1. Organization-Level Roles
Organization roles govern administrative access to the entire company or department space on GitHub:
- Organization Owner (Superadmin): Holds total administrative control. Owners can configure billing, delete repositories, invite or remove users, enforce organization-wide two-factor authentication (2FA), configure single sign-on (SSO), and manage security policies.
Security Rule: Keep Organization Owners limited to 2 or 3 trusted technical leads. Never promote someone to Organization Owner simply so they can create or push to repositories.
- Organization Member: The default role for developers, systems administrators, and IT staff. Members have no administrative control over organizational billing or security, but can join teams and access repositories granted to them.
- Security Manager: A specialized organizational role that gives designated security engineers read access to all repositories in the organization and permission to view and manage security alerts, secret scanning detections, and vulnerability advisories.
- Billing Manager: Manages payment methods, subscriptions, and spending limits without granting access to repository code.
2. Team-Level Roles
Within an individual Team (e.g., @enterprise-it/sysadmins):
- Team Maintainer: Can add or remove members from that specific team, change the team description, edit team avatars, and manage the team’s repository access list. This distributes administrative overhead so department leads manage their own groups without needing Organization Owner privileges.
- Team Member: A standard participant in the team. They inherit whatever repository access the team has been granted and can be mentioned in discussions or Pull Requests using the team handle (e.g.,
@org/team-name).
3. Repository Permission Levels
When assigning a Team to a Repository, select the least privileged role required for their daily duties:
| Permission Level | Permitted Actions | Recommended Use Case |
|---|---|---|
| Read | View code, clone, pull, open issues, view discussions. | Contractors, compliance auditors, or cross-functional observers. |
| Triage | Read access plus the ability to label, assign, and close issues and pull requests (cannot push code). | IT helpdesk staff or junior operators managing ticket backlogs. |
| Write | Read access plus pushing branches, creating and merging pull requests, and editing wiki pages. | Standard role for active systems administrators and developers. |
| Maintain | Write access plus managing repository settings, actions, releases, and issue templates (cannot delete repo). | Senior technical leads overseeing day-to-day repository operations. |
| Admin | Total repository control: deleting repository, managing webhooks, altering branch protection rules. | Repository owners and infrastructure engineering managers. |
Step-by-Step: Creating a Team and Granting Repository Access
Let’s walk through creating a team for an IT systems administration group and granting them access to an internal PowerShell repository.
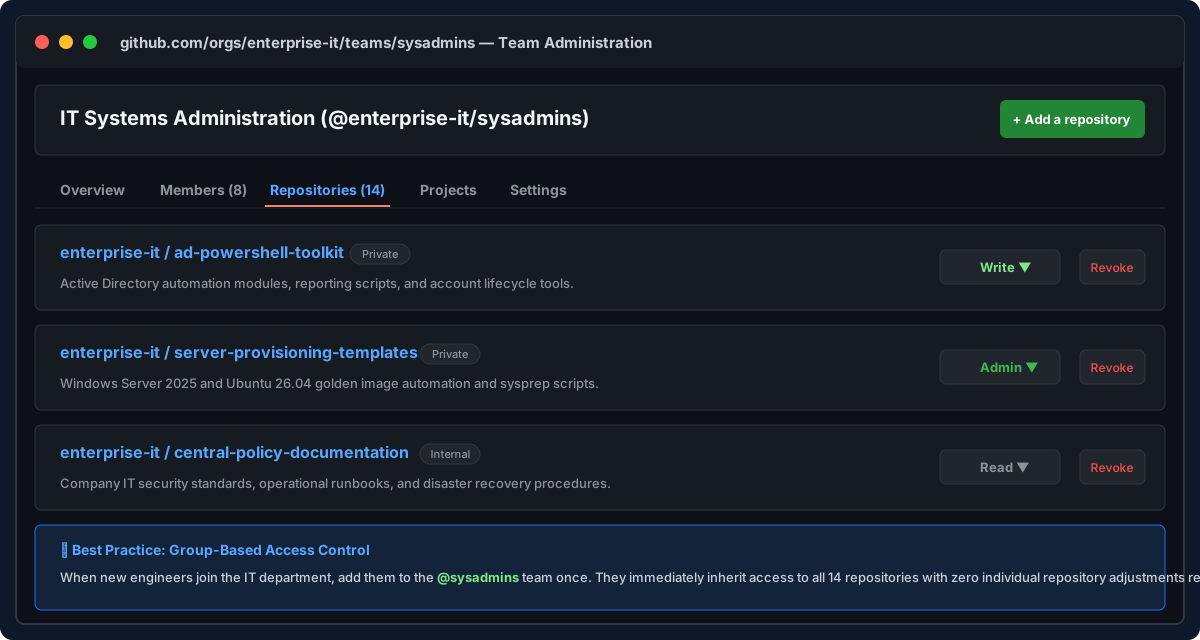
GitHub web interface showing team administration and granular repository permission assignments.
Step 1: Create the Team
- Navigate to your GitHub Organization homepage (e.g.,
https://github.com/enterprise-it). - Click the Teams tab in the top navigation bar.
- Click the green New team button.
- Fill in the team details:
- Team name:
sysadmins(GitHub will assign the mention handle@enterprise-it/sysadmins). - Description:
Active Directory, Windows Server, and core automation administrators. - Visibility:
- Visible: Any organization member can see the team, view its members, and mention it in PRs (
@enterprise-it/sysadmins). Recommended for normal internal collaboration. - Secret: Visible only to team members and Organization Owners. Useful for external contractors or sensitive security groups.
- Visible: Any organization member can see the team, view its members, and mention it in PRs (
- Parent team (Optional): You can nest teams hierarchically (e.g., nesting
sysadminsanddevopsunder a parentinfrastructureteam). Nested teams automatically inherit permissions granted to the parent.
- Team name:
- Click Create team.
Step 2: Add Members to the Team
- On the team page, click the Members tab.
- Click Add a member.
- Search for the colleague’s GitHub username or work email.
- Select their team role:
- Choose Maintainer for team leads or senior administrators who need to manage membership.
- Choose Member for standard team contributors.
- Click Save changes.
Step 3: Grant the Team Repository Access
Rather than granting individual developers permissions on every repository, link the entire team to the repositories they maintain:
- On the team’s page, click the Repositories tab.
- Click Add repository.
- In the search box, select the target repository (for example,
ad-powershell-toolkit). - In the permission dropdown, select Write (or Maintain).
- Click Add repository to team.
Now, every current and future member of the @enterprise-it/sysadmins team immediately has Write access to ad-powershell-toolkit. When a team member departs, removing them from the team revokes their access across all 14 linked repositories simultaneously.
How Team Members Collaborate via Pull Requests
With repository permissions established, team members must follow a structured code-promotion workflow. Direct commits to production branches (main) should be strictly forbidden.
Enforcing Branch Protection on the Main Branch
To prevent accidental breakage, configure branch protection on main:
- Navigate to the repository on GitHub and click Settings.
- In the left menu under Code and automation, click Branches.
- Click Add branch protection rule (or Add rule).
- In Branch name pattern, enter
main. - Check the following vital governance safeguards:
- Require a pull request before merging:
- Check Require approvals and set the number to 1 (or 2 for high-risk production scripts).
- Check Dismiss stale pull request approvals when new commits are pushed (ensures any subsequent modifications are re-reviewed).
- Check Require review from Code Owners (enforces review from designated area leads).
- Require status checks to pass before merging:
- Select automated CI jobs (e.g., Pester unit test suites or PSScriptAnalyzer linter workflows).
- Do not allow bypassing the above settings: Prevents even repository administrators from pushing directly to
mainwithout a reviewed PR.
- Require a pull request before merging:
- Click Create or Save changes.
The Team Member Workflow: Branch, Edit, and PR
Team members follow this standard sequence in PowerShell or WSL:
# 1. Update local main branch
git switch main
git pull origin main

# 2. Create a focused feature branch
git switch -c feature/tls-13-enforcement

# 3. Modify your PowerShell scripts and test locally
# Edit scripts in VS Code: code .

# 4. Check status and stage changes
git status
git add .\src\Enforce-Tls13Policy.ps1
git commit -m "feat: enforce TLS 1.3 registry cipher suites on Windows Server"

# 5. Push the branch to GitHub
git push -u origin feature/tls-13-enforcement
When the branch is pushed, open GitHub in your browser. Click Compare & pull request, describe the changes, link any related operational ticket, and mention your team in the description:
### Summary of Changes
Enforces TLS 1.3 and disables legacy TLS 1.0/1.1 protocols via Group Policy registry keys.

Tested in the Lab Hyper-V environment on Windows Server 2025.

cc @enterprise-it/sysadmins
Admin Guide: Reviewing and Merging Pull Requests
When a team member opens a Pull Request, team maintainers and peers receive notifications to review the proposed code.
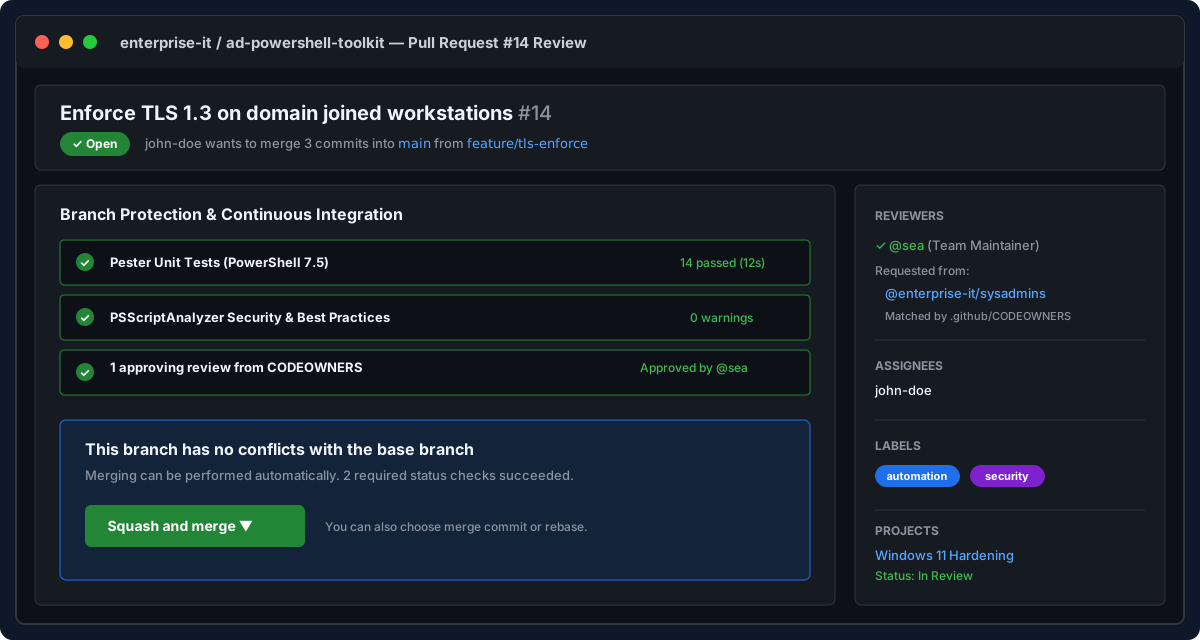
GitHub Pull Request review interface showing automated checks, CODEOWNERS approval, and squash merge actions.
Step 1: Inspecting Diffs and Automated Checks
- Open the Pull Request on GitHub.
- Review the Checks section at the bottom of the PR:
- Confirm that all automated GitHub Actions CI tests (such as Pester tests and PSScriptAnalyzer security linters) display green checkmarks.
- If an automated check fails, click Details to see which line failed syntax or unit tests. Do not review incomplete or broken code.
- Click the Files changed tab to inspect the line-by-line diff.
Step 2: Conducting the Code Review
Reviewing infrastructure and administration scripts requires verifying safety, error handling, and operational resilience:
- Parameter Validation: Are parameters strongly typed (e.g.,
[string],[ValidateNotNullOrEmpty()])? - Credential Safety: Are there hardcoded passwords, plaintext tokens, or internal IP addresses?
- Error Handling: Does the script use structured
try / catch / finallyblocks with$ErrorActionPreference = 'Stop'? - WhatIf Support: For destructive operations (e.g., removing accounts or stopping services), does the function support
[CmdletBinding(SupportsShouldProcess)]so administrators can test with-WhatIf?
To leave line-specific feedback, hover over any line number in the diff and click the blue + icon:
- To suggest a direct modification, click the Add a suggestion icon. GitHub inserts an interactive code suggestion that the author can accept with a single click.
- When finished, click Review changes in the upper right:
- Comment: General questions without blocking the PR.
- Request changes: Halts the PR from merging until the author commits requested fixes.
- Approve: Authorizes the code to be merged into
main.
Automating Reviewers with CODEOWNERS
In active repositories, manually selecting reviewers on every Pull Request leads to forgotten reviews and bottlenecks. GitHub provides the CODEOWNERS mechanism to automatically request reviews from designated teams based on file paths.
Create a file named .github/CODEOWNERS in your repository’s default branch:
# .github/CODEOWNERS
# Syntax: <pattern> <@owner or @team>

# Default fallback: The core sysadmin team owns everything
* @enterprise-it/sysadmins

# Specific PowerShell modules required PowerShell lead review
/src/modules/ActiveDirectory/* @enterprise-it/sysadmins @sea
/src/modules/Exchange/* @enterprise-it/sysadmins

# Cloud and Terraform infrastructure definitions require DevOps review
/infra/terraform/* @enterprise-it/devops-cloud
/infra/ansible/* @enterprise-it/devops-cloud

# Security baseline scripts require SecOps approval
/security/baselines/* @enterprise-it/secops
How CODEOWNERS Enforces Quality
- When a team member creates a PR altering files under
/infra/terraform/, GitHub automatically adds@enterprise-it/devops-cloudto the PR’s Reviewers list. - If branch protection has Require review from Code Owners checked, the PR cannot be merged until a member of
@enterprise-it/devops-cloudexplicitly signs off, even if another colleague already approved it.
Using Repositories and GitHub Projects to Manage Team Code
Managing team scripts requires more than raw version control; it requires visibility into what work is pending, who is working on it, and what has been deployed.
Monorepo vs. Multi-Repo for IT Departments
When structuring team repositories, choose between two primary architectures:
| Approach | Architecture | Advantages | Disadvantages |
|---|---|---|---|
| Monorepo | Single repository containing all company scripts (ad-tools/, monitoring/, provisioning/). |
Easy global searches; unified issue tracking; single set of branch protection rules. | Repository size can grow large; CI pipelines take longer to test all folders. |
| Multi-Repo | Separate focused repositories (it-ad-module, it-hyperv-scripts, it-caddy-config). |
Granular access control; independent versioning and release cycles; fast CI. | Harder to track cross-project work; more repositories to administer. |
Recommendation: Start with a few well-scoped functional repositories (e.g.,
infrastructure-powershell-toolkitandserver-golden-images), managed by your central IT team.
Managing Sprints and Backlogs with GitHub Projects
To keep team tasks organized, create an Organization-level GitHub Project (v2):
- In your organization, click Projects → New project.
- Select the Board layout.
- Configure core columns:
Backlog,Ready for Work,In Progress,Under Review, andDeployed / Done. - Add team-specific custom fields:
- Environment:
Production,Staging,Lab. - Platform:
Windows Server,WSL / Ubuntu,Azure. - Priority:
P1-Critical,P2-High,P3-Standard.
- Environment:
- Link your team repositories. When team members open issues or PRs, add them to the project board.
- Enable Project Automation: Configure GitHub to automatically move cards to
In Progresswhen a feature branch is created, toUnder Reviewwhen a PR opens, and toDonewhen the PR is merged intomain.
Troubleshooting Common Team Governance Pitfalls
Pitfall 1: “remote: Permission to user/repo denied to user”
Symptom: A team member runs git push -u origin feature/branch and encounters a permission error.
Cause: The user was added to the organization, but:
- They have not yet accepted their organization email invitation.
- They were not added to the specific Team that holds
Writepermissions on that repository. - Their local Git client is authenticating with an old, cached personal token instead of their organization-authorized account.
Resolution:
- Check the Organization’s People tab to verify their invitation is accepted.
- Inspect the repository’s Settings → Collaborators and teams to verify the member’s team is listed with Write permissions.
- Run
cmdkey /listin Windows PowerShell to inspect and clear outdated credentials in Windows Credential Manager.
Pitfall 2: PR Cannot Merge: “At least 1 approving review required”
Symptom: The author approved their own PR or another colleague approved, but GitHub blocks merging.
Cause: Branch protection rules require:
- Approvals from someone other than the PR author.
- An approval specifically from a member of the designated
CODEOWNERSteam.
Resolution: Tag a team maintainer listed in CODEOWNERS in the PR discussion: @enterprise-it/sysadmins please review when available.
Pitfall 3: Submodule / Shared Dependency Authentication Failures
Symptom: When a team repository uses Git submodules or references another internal repository, automated CI or member clones fail with Repository not found.
Cause: The user (or the GitHub Actions GITHUB_TOKEN) has permission on the parent repository, but lacks read access to the dependent submodule repository.
Resolution: Ensure your team is granted Read access on all shared dependency and module repositories across the organization.
Summary Checklist for Team Leads
| Governance Task | Implementation Action | Benefit |
|---|---|---|
| Access Management | Group users into Teams; grant repo permissions to Teams only | Zero-touch offboarding & onboarding |
| Production Safety | Enforce Branch Protection on main |
No unreviewed or untested code in production |
| Review Automation | Configure .github/CODEOWNERS |
Automated reviewer routing to subject-matter experts |
| CI Quality Gates | Require passing Pester & PSScriptAnalyzer tests | Syntax and security flaws caught before merge |
| Clean History | Enforce Squash and merge on PRs | Linear, easily auditable main commit log |
| Backlog Visibility | Track work in GitHub Projects | Transparent sprint priorities and team accountability |
Structuring your team through GitHub Organizations, Teams, and protected Pull Request workflows establishes an enterprise-grade development standard for all infrastructure and administration code.
💬 Comments