While public cloud platforms like GitHub and GitLab are ubiquitous, many enterprise environments, air-gapped networks, and privacy-conscious organizations require keeping their source code and automation scripts entirely on-premises. Storing internal credentials, proprietary PowerShell modules, and infrastructure configurations within your local LAN ensures compliance, eliminates third-party cloud outages, and gives administrators complete sovereignty over their data.
However, setting up a bare Git server with plain SSH shared folders lacks the collaborative features teams expect: interactive code browsing, visual diff comparisons, issue tracking, organization teams, branch protection, and Pull Request reviews.
This guide walks through deploying a production-ready, open-source Git server on Ubuntu Server that mirrors GitHub’s web interface, command-line operations, and team permissions while consuming less than 150 MB of memory.
Quick answer
To build a lightweight, GitHub-like local Git server on Ubuntu 24.04 or 26.04 LTS:
- Install dependencies:
sudo apt update && sudo apt install -y git sqlite3 curl caddy - Create system user:
sudo adduser --system --shell /bin/bash --group --disabled-password --home /home/git git - Download Gitea: Download the precompiled binary to
/usr/local/bin/gitea, make it executable, and configure directory ownership in/var/lib/giteaand/etc/gitea. - Configure systemd: Create
/etc/systemd/system/gitea.serviceand enable the service withsudo systemctl enable --now gitea. - Set up Caddy reverse proxy: Proxy
https://git.yourdomain.localtohttp://127.0.0.1:3000with automated TLS. - Complete web installation: Open
https://git.yourdomain.localin your browser, select SQLite3, define your base URL, and configure your initial administrator account.
Why Build a Local Self-Hosted Git Server
Deploying a local Git server provides substantial operational advantages for IT departments and homelab administrators:
- Air-Gapped and Internal Network Security: Local network repositories remain functional even during ISP outages or when external internet connectivity is completely blocked for security compliance.
- Data Sovereignty and Compliance: Intellectual property, proprietary automation logic, and sensitive server orchestration playbooks never leave your physical hardware or private hypervisor.
- Zero Subscription Fees for Unlimited Users: Cloud platforms charge per-seat monthly fees for private organization features. A self-hosted server allows adding hundreds of internal operators, service accounts, and CI runners without license constraints.
- Speed on the LAN: Cloning massive repositories or multi-gigabyte infrastructure archives across a 10GbE or 1GbE local network is dramatically faster than pulling across commercial WAN connections.
Choosing the Right Open-Source Platform: Gitea vs GitLab vs Bare Git
Before installing packages, evaluate the primary open-source Git server options:
| Feature / Metric | Bare Git over SSH | GitLab Community Edition (CE) | Gitea / Forgejo (Recommended) |
|---|---|---|---|
| Web Interface | None (CLI only) | Full web UI, very feature-dense | GitHub-identical clean web UI |
| RAM Footprint | ~5 MB | 4 GB – 8 GB minimum | < 150 MB (Single Go binary) |
| Team & Orgs | Manual Linux groups | Full Organization & Group RBAC | Full Organizations, Teams, RBAC |
| Pull Requests & Reviews | None | Supported | Supported with branch protection |
| Database Requirement | None | PostgreSQL + Redis (complex) | SQLite3 (embedded) or PostgreSQL |
| Maintenance Burden | Low | High (20+ background daemons) | Extremely Low (single systemd service) |
For administrators who want GitHub’s visual interface, team permissions, and Pull Request workflow without dedicating an entire 16 GB server to running GitLab’s bloated Ruby and Redis stack, Gitea (or its community fork Forgejo) is the industry-standard choice.
Prerequisites and Server Architecture
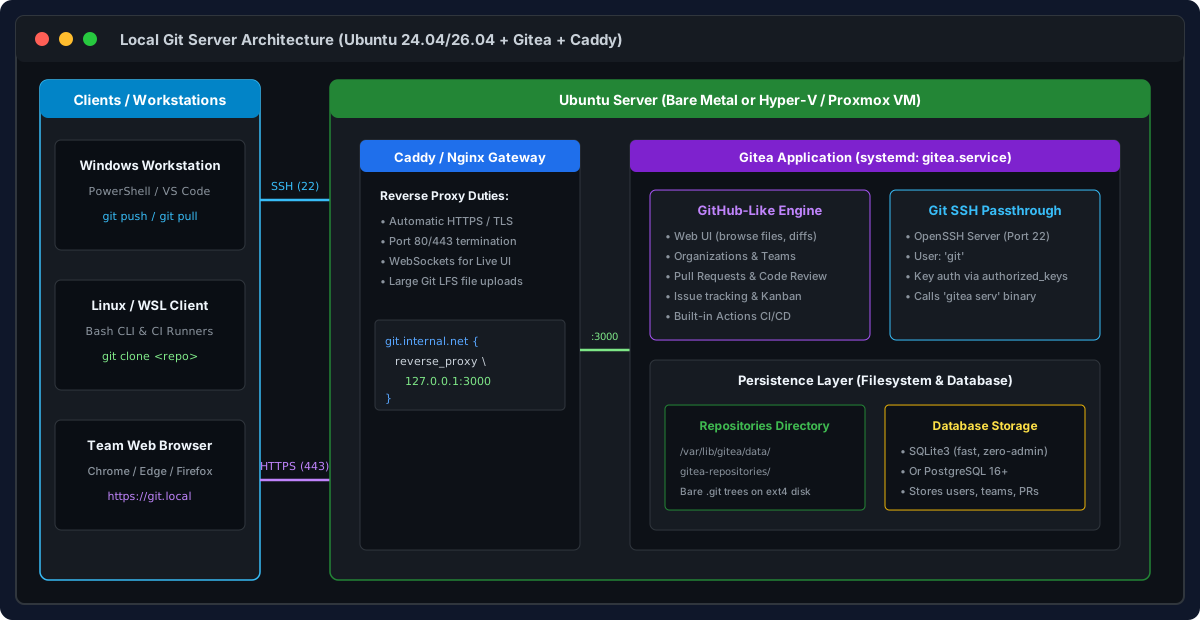
Architecture of the local Git server: workstations connect via SSH (Port 22) and HTTPS (Port 443) through Caddy to the Gitea daemon and SQLite database.
Hardware and OS Requirements
- Operating System: Ubuntu Server 24.04 LTS or 26.04 LTS (fresh minimal installation).
- CPU / Memory: 1 vCPU and 1 GB RAM is sufficient for up to 50 active engineers.
- Disk Space: 20 GB+ on an ext4 partition mounted under
/var/lib/giteafor storing Git repositories. - Internal DNS Record: An A-record on your local DNS server (or Active Directory DNS) pointing to the Ubuntu server’s static IP (e.g.,
git.internal.net->192.168.1.50).
Step 1: Installing Dependencies and Configuring System User
Log in to your Ubuntu server via SSH and prepare the system environment.
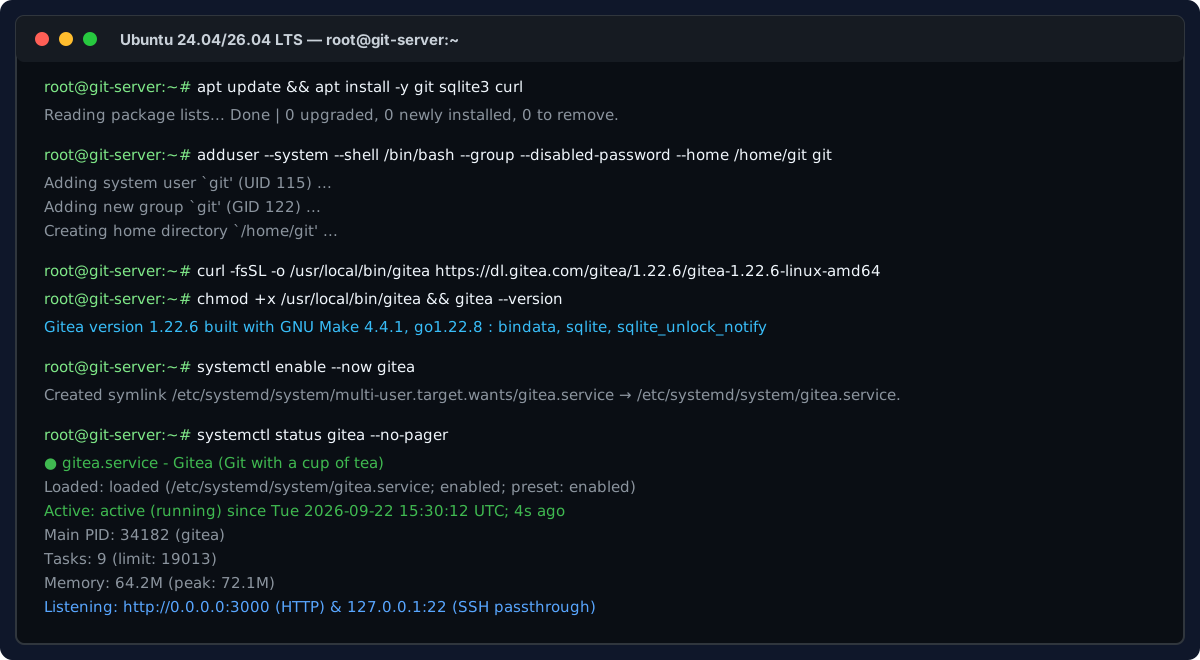
Ubuntu terminal output displaying dependency installation, dedicated git user creation, and service readiness.
1. Update Packages and Install Core Tools
Install Git, SQLite3 (the embedded database engine), Curl, and OpenSSH:
sudo apt update && sudo apt upgrade -y
sudo apt install -y git sqlite3 curl gnupg
Verify that the native Git version on Ubuntu is current:
git --version2. Create the Dedicated Git Service User
Running Git services as root is a major security risk. Create a dedicated system user and group named git with its home directory at /home/git:
sudo adduser \
   --system \
   --shell /bin/bash \
   --gecos 'Git Version Control' \
   --group \
   --disabled-password \
   --home /home/git \
   git
Step 2: Installing and Configuring Gitea via Systemd
Gitea is distributed as a self-contained, statically compiled Go binary, making installation simple and clean.
1. Download and Install the Binary
Download the latest stable release for Linux x86_64, verify permissions, and install it to /usr/local/bin:
# Fetch the latest stable binary
GITEA_VERSION="1.22.6"
sudo curl -fsSL -o /usr/local/bin/gitea \
  "https://dl.gitea.com/gitea/${GITEA_VERSION}/gitea-${GITEA_VERSION}-linux-amd64"

# Grant execution rights
sudo chmod +x /usr/local/bin/gitea

# Test binary execution
gitea --version
2. Create Directory Structure and Permissions
Gitea requires specific directory locations for repository data, logs, custom assets, and configuration files:
# Create core directories
sudo mkdir -p /var/lib/gitea/{custom,data,indexers,public,log}
sudo mkdir -p /etc/gitea

# Set ownership to the git service user
sudo chown -R git:git /var/lib/gitea/
sudo chmod -R 750 /var/lib/gitea/

# Temporarily allow the git user to write configuration during first-time setup
sudo chown -R root:git /etc/gitea
sudo chmod -R 770 /etc/gitea
3. Create the Systemd Service Unit
To ensure Gitea starts automatically on boot and recovers from crashes, register it as a system service.
Create /etc/systemd/system/gitea.service:
sudo tee /etc/systemd/system/gitea.service > /dev/null << 'EOF'
[Unit]
Description=Gitea (Git with a cup of tea)
After=network.target

[Service]
RestartSec=2s
Type=simple
User=git
Group=git
WorkingDirectory=/var/lib/gitea/
ExecStart=/usr/local/bin/gitea web --config /etc/gitea/app.ini
Restart=always
Environment=USER=git HOME=/home/git GITEA_WORK_DIR=/var/lib/gitea

# Security Sandbox Hardening
CapabilityBoundingSet=CAP_NET_BIND_SERVICE
AmbientCapabilities=CAP_NET_BIND_SERVICE
NoNewPrivileges=true
ProtectSystem=full
ProtectHome=read-only
ReadWritePaths=/var/lib/gitea /etc/gitea /home/git

[Install]
WantedBy=multi-user.target
EOF
Reload systemd and start Gitea:
sudo systemctl daemon-reload
sudo systemctl enable --now gitea
sudo systemctl status gitea --no-pager
Gitea is now active and listening internally on 127.0.0.1:3000.
Step 3: Setting Up Reverse Proxy and SSL with Caddy
While Gitea can serve HTTP directly, placing a reverse proxy like Caddy in front handles automatic TLS certificate generation, terminates ports 80/443, and handles large Git LFS file streaming safely.
1. Install Caddy on Ubuntu
Install the official Caddy package:
sudo apt install -y debian-keyring debian-archive-keyring apt-transport-https curl
curl -1sLf 'https://dl.cloudsmith.io/public/caddy/stable/gpg.key' | sudo gpg --dearmor -o /usr/share/keyrings/caddy-stable-archive-keyring.gpg
curl -1sLf 'https://dl.cloudsmith.io/public/caddy/stable/debian.deb.txt' | sudo tee /etc/apt/sources.list.d/caddy-stable.list
sudo apt update
sudo apt install -y caddy
2. Configure Caddyfile
Edit /etc/caddy/Caddyfile to proxy requests to Gitea’s internal port:
sudo tee /etc/caddy/Caddyfile > /dev/null << 'EOF'
git.internal.net {
    # If using local self-signed internal certificates
    tls internal

    # Proxy all traffic to Gitea
    reverse_proxy 127.0.0.1:3000 {
        # Support large Git file pushes
        transport http {
            read_buffer 4096
        }
    }
}
EOF
Restart Caddy to apply the configuration:
sudo systemctl restart caddy
sudo systemctl status caddy --no-pager
Step 4: Initial Web Setup and Administrator Configuration
Now open your web browser and navigate to your server’s domain: https://git.internal.net (or http://server-ip:3000 if testing before DNS).
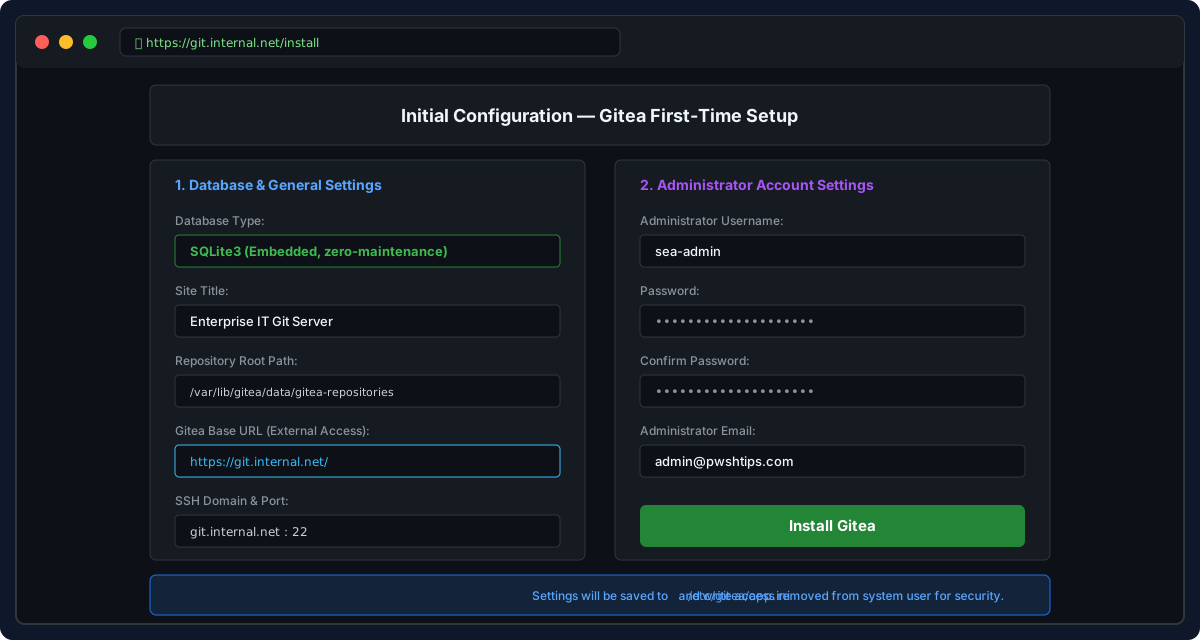
Gitea initial configuration wizard: database selection, server domain settings, and administrator account creation.
Configuration Settings Breakdown
- Database Type: Select SQLite3.
- Path:
/var/lib/gitea/data/gitea.db(fast, maintenance-free, ideal for internal teams).
- Path:
- General Settings:
- Site Title: Enter your team name (e.g.,
Enterprise IT Git). - Repository Root Path:
/var/lib/gitea/data/gitea-repositories - Git LFS Root Path:
/var/lib/gitea/data/lfs - Run As Username:
git
- Site Title: Enter your team name (e.g.,
- Server and Third-Party Service Settings:
- SSH Domain:
git.internal.net - SSH Port:
22 - Gitea HTTP Listen Port:
3000 - Gitea Base URL:
https://git.internal.net/
- SSH Domain:
- Administrator Account Settings (Expand section):
- Administrator Username: Choose your primary admin handle (e.g.,
sea-admin). - Password: Choose a complex administrative password.
- Confirm Password: Re-enter the password.
- Email Address: Enter your work email (
[email protected]).
- Administrator Username: Choose your primary admin handle (e.g.,
- Click Install Gitea.
Securing Configuration File Permissions
Once setup finishes, lock down /etc/gitea/app.ini so the web application cannot overwrite its own configuration file during runtime:
sudo chmod 750 /etc/gitea
sudo chmod 640 /etc/gitea/app.ini
Step 5: Testing Command Line Access via SSH and HTTPS
With the server running, let’s verify both HTTPS and SSH Git commands from Windows PowerShell or WSL.
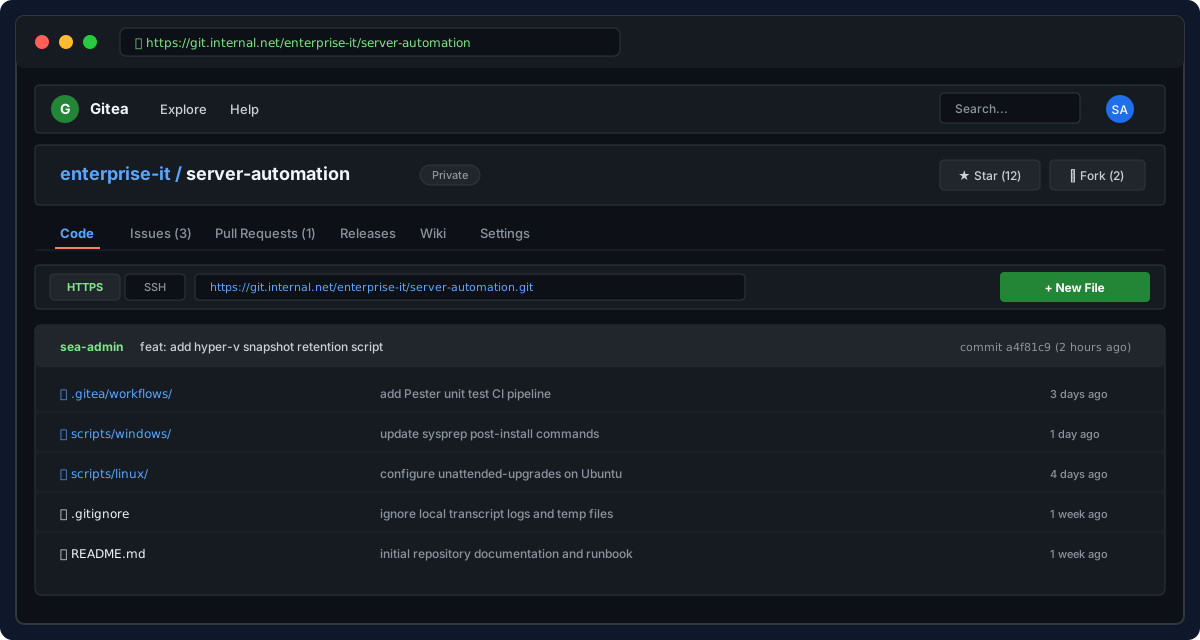
Gitea web interface displaying an active repository, commit history, and GitHub-identical clone and Pull Request tabs.
Method 1: Command Line Access via HTTPS
In Gitea’s web UI, click + → New Repository to create a repo named server-automation.
From PowerShell on your workstation:
# Clone the repository over HTTPS
git clone https://git.internal.net/sea-admin/server-automation.git
cd server-automation

# Add a test script
Set-Content -Path "Get-UptimeReport.ps1" -Value "Get-CimInstance Win32_OperatingSystem | Select-Object LastBootUpTime"

# Stage, commit, and push
git add Get-UptimeReport.ps1
git commit -m "feat: initial uptime reporting script"
git push -u origin main
When prompted for credentials, enter your Gitea username and password (or a generated Personal Access Token).
Method 2: Command Line Access via SSH
For passwordless, key-based Git operations:
- Copy your workstation’s public SSH key (
Get-Content ~/.ssh/id_ed25519.pubin PowerShell). - In Gitea, navigate to Settings → SSH / GPG Keys.
- Click Add Key, paste your public key, and click Add Key.
Now clone and push over SSH without typing passwords:
git clone [email protected]:sea-admin/server-automation.git
cd server-automation

echo "# Self-Hosted Server Automation" >> README.md
git add README.md
git commit -m "docs: add repository readme"
git push origin main
Step 6: Configuring Organizations, Teams, and Pull Requests
Gitea supports GitHub-style Organizations, Teams, and Pull Requests out of the box.
1. Create an Organization
- Click the
+icon in Gitea’s top navigation bar → select New Organization. - Name the organization (e.g.,
enterprise-it). - Set visibility to Limited (visible only to logged-in internal users) or Private.
2. Create Teams and Assign Permissions
- Inside the
enterprise-itorganization, click Teams → New Team. - Name the team
sysadmins. - Set repository access permissions:
- Specific Repositories: Select the automation scripts repo.
- Permission Level: Choose Write (or Admin).
- Add team members by their local Gitea usernames.
3. Enforcing Branch Protection and Pull Requests
To prevent direct commits to main and enforce code reviews:
- Navigate to the repository in Gitea → Settings → Branches.
- Click Add Branch Protection Rule for
main. - Check Enable Branch Protection.
- Check Require approval of Pull Request before merging (set to 1 reviewer).
- Check Block merge on rejected reviews.
- Click Save.
Now, when any administrator runs git push origin main, Gitea rejects the push:
remote: Gitea: Branch 'main' is protected and direct pushes are forbidden.
fatal: could not read from remote repository.
The engineer must push to a feature branch (git push origin feature/patch) and open a Pull Request via the web interface. Once a team lead reviews the diff and approves it, the PR can be merged using Squash and merge.
Server Backup, Maintenance, and Upgrades
Because Gitea uses SQLite and clean directory paths, backing up your entire Git server requires only one command.
1. Creating a Full Hot Backup
Run Gitea’s built-in dump utility as the git user:
sudo -u git gitea dump \
  -c /etc/gitea/app.ini \
  --file /tmp/gitea-backup-$(date +%F).zip
This creates a single ZIP archive containing:
- The complete SQLite database (
gitea.db). - All raw Git repository files.
- Configuration files (
app.ini). - User SSH authorized keys, uploaded attachments, and avatars.
Move the resulting archive to an offsite network share or NAS.
2. Upgrading Gitea to a New Version
Upgrading Gitea takes less than 60 seconds:
# 1. Stop service
sudo systemctl stop gitea

# 2. Download new binary (replace version number)
sudo curl -fsSL -o /usr/local/bin/gitea \
  "https://dl.gitea.com/gitea/1.23.0/gitea-1.23.0-linux-amd64"
sudo chmod +x /usr/local/bin/gitea

# 3. Start service (database migrations run automatically)
sudo systemctl start gitea
Summary Checklist
| Component | Technology | Role |
|---|---|---|
| Operating System | Ubuntu Server 24.04/26.04 | Host operating system |
| Git Engine | Gitea (Single Go Binary) | Web UI, API, Teams, Pull Requests |
| Database | SQLite3 | Embedded metadata storage (<50MB RAM) |
| Reverse Proxy | Caddy | HTTPS/TLS termination and port 443 mapping |
| CLI Access | OpenSSH + Git HTTPS | Seamless developer terminal pushes |
| Access Control | Organizations & Teams | Role-based repository permissions |
A self-hosted Gitea server provides the complete modern GitHub developer experience—web browsing, team permissions, code reviews, and fast command-line access—while keeping your automation scripts completely private within your own infrastructure.
💬 Comments