Vim is an improved version of the traditional vi editor. It is a popular command-line editor on Linux and Unix systems, and it is also available on Windows. Many administrators use it to edit configuration files directly on a server, often through an SSH session.
The first time Vim refuses to save a long configuration file, it can feel like the file is lost. The content is still in Vim’s buffer, but the current user does not have permission to write the file back to disk. The important thing is to stay in Vim and use the buffer to write the file through sudo.
The error
I opened a configuration file in Vim, edited it, and entered :wq to write and quit. Vim displayed this message in red:
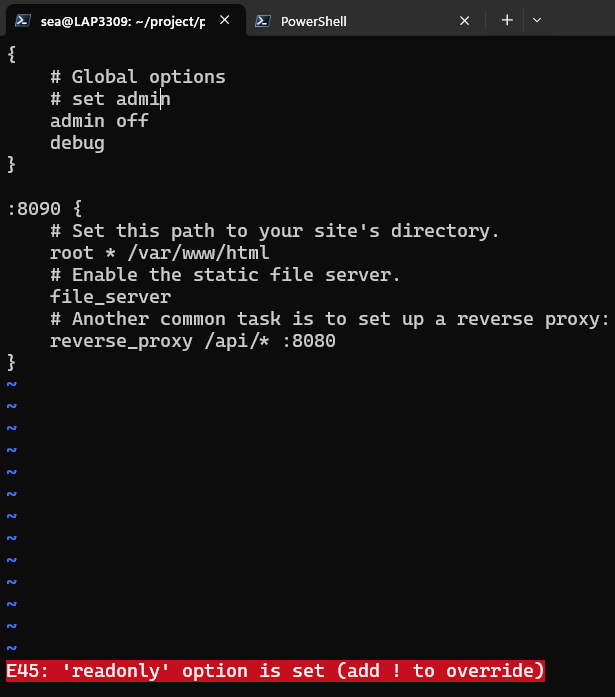
Vim displays E45 when the file is read-only for the current user.
The important part of the error is:
E45: 'readonly' option is set (add ! to override)
This normally means that the current user cannot write to the file. Common examples include editing a file under /etc, /var, or another system directory as a normal user. The file may be readable, so Vim can open and display it, but the user may not have write permission.
Do not close Vim in a panic. If the file is very long, closing the editor before saving the buffer can mean losing the changes. The buffer is the copy of the file currently open in Vim, and it is still available while Vim remains open.
The life-saving command
From Vim’s command mode, run:
:w !sudo tee %
Press Enter after typing the command. Vim may ask for the sudo password. After authentication, tee writes the buffer back to the original file with root privileges.
This command looks strange because it is not a normal Vim save command. It tells Vim to send the contents of the current buffer to an external command. The external command is sudo tee %, which writes the text to the original file.
What each part means
The command is:
:w !sudo tee %
Each part has a specific purpose.
:
The colon opens Vim’s command-line mode. Commands such as :w, :q, :wq, and :set are entered after the colon.
w
The w means write. In the normal form, :w saves the current buffer to the file associated with the Vim session.
When w is followed by an exclamation mark and a command, Vim writes the buffer to that external command instead of writing directly to the file itself.
!
The exclamation mark tells Vim to execute an external shell command. In this example, Vim sends the contents of the current buffer to the command that follows the exclamation mark.
The buffer is not written directly by Vim using the current user’s file permission. Instead, the buffer is passed through the external command. That is why this method can work when the normal :w command fails.
sudo
sudo runs the following command with elevated privileges, normally as root. The current user must be allowed to use sudo and may need to enter their password.
Using sudo does not change the ownership of the file. It only gives the tee process enough permission to write the existing file. Use this method only when you understand why the file requires elevated access.
tee
The tee command reads data from standard input, writes it to a file, and also prints the data to standard output. In this case, Vim sends the complete buffer to standard input, and sudo tee writes it to the target file as root.
The name comes from the plumbing device shaped like the letter T: input comes in, and the data can be sent to a file and the screen at the same time.
%
Inside a Vim command, % represents the path of the current editing file. It expands to the file associated with the current buffer.
For example, if Vim opened /etc/caddy/Caddyfile, this command is effectively writing to that same path:
sudo tee /etc/caddy/Caddyfile
This is why % is useful. I do not need to type a long path again, and I am less likely to save the buffer to the wrong file.
What the complete command does
The full sequence is:
- Vim reads the contents of the current buffer.
- The
:wcommand sends the buffer to the external command after!. sudostartsteewith root privileges.teewrites the buffer to the current file represented by%.teealso prints the received text back to the terminal.
In other words, Vim uses a pipe-like handoff to send the complete buffer to sudo tee. tee writes as root to the original file, so the updated content is stored on disk without closing Vim or discarding the buffer.
Suppress the output
Because tee prints the entire buffer to the screen, a long file can scroll through the terminal. To write the file while discarding tee’s normal output, redirect it to /dev/null:
:w !sudo tee % > /dev/null
This is usually the cleaner version for a large configuration file. It still writes the buffer to the original file, but the terminal does not display every line.
Handle the W12 warning
After using the command with tee, Vim may show a W12 warning:

Vim reports that the file changed on disk while the buffer was also changed in Vim.
The warning appears because tee changed the file on disk while Vim still has its own modified copy in memory. Vim asks which version should be used:
[O]k, (L)oad File, Load File (a)nd Options:
Enter L for Load File. Vim reloads the version that was written to disk by sudo tee. The buffer and the file on disk are then synchronized with the content you just saved.
After loading the file, use:
:q!
The q! exits Vim without attempting another normal write. The file has already been saved by sudo tee, so there is no need to run :wq again.
Do not use :wq !sudo tee %
It is tempting to combine the write-and-quit command with the external write command:
:wq !sudo tee %
Do not use that form. :wq is a combined Vim command that writes and quits, and it does not accept the external-command form in the way :w does. It can produce another error or fail to run the command as intended.
Use the commands separately:
:w !sudo tee % > /dev/null
Then choose L if Vim displays the W12 warning, and finally run:
:q!
This makes each step explicit and avoids trying to save and exit before Vim has reloaded the updated file.
Write to a different file
The % character can be replaced with another path. This writes the current buffer to a different file instead of the file originally opened in Vim:
:w !sudo tee /etc/nginx/nginx.conf
This is useful when a file was opened from a temporary path or when I want to write the edited content into a specific system configuration path. The destination directory must exist, and the sudo account must have permission to write the destination.
If the destination is under /tmp, the current user can often write it without sudo:
:w !tee /tmp/test.txt
The same approach works for a file in the current user’s home directory. The simplest form is a normal Vim write:
:w ~/backup.conf
Or use tee when an external write is more convenient:
:w !tee ~/backup.conf
Use the normal :w path form when there is no permission problem. The tee method is especially useful when the destination requires elevated permission or when I want to make the write path explicit.
Create a w!! shortcut
Many Vim users create a command-line abbreviation for the elevated write command. Add this line to ~/.vimrc:
cnoreabbrev w!! w !sudo tee % > /dev/null
cnoreabbrev creates an abbreviation in Vim’s command-line mode. When w!! is entered and the command is submitted, Vim expands it to:
:w !sudo tee % > /dev/null
After adding the line, reload the Vim configuration immediately with:
:source ~/.vimrc
The command is :source, not :siyrce. The :source command reads the Vim configuration file again without requiring Vim to close. Alternatively, exit Vim and start it again.
After the abbreviation is active, use this shorter command when a file is read-only:
:w!!
Vim expands the command, asks for the sudo password if necessary, and writes the buffer through sudo tee. If the W12 warning appears, enter L to load the saved file, then use :q! to exit.
A few safety checks
Before overwriting an important configuration file, confirm the current file path:
:echo expand('%:p')
This prints the full path of the current buffer. It is worth checking when several configuration files have similar names.
You can also check whether Vim believes the buffer is modified:
:set modified?
After L reloads the file, Vim should no longer show the buffer as modified unless another change was made after the reload.
For a critical system file, make a backup before changing it when possible. A backup does not replace careful review, but it gives you a recovery option if the configuration contains a syntax error.
Summary
When :wq fails with E45: 'readonly' option is set, the file is usually readable but not writable by the current user. Keep Vim open and save the buffer through sudo tee:
| Command | Use | Next step |
|---|---|---|
:w !sudo tee % |
Save the current buffer to the original file with root permission. | Enter the sudo password if prompted. |
:w !sudo tee % > /dev/null |
Save to the original file without printing the buffer to the terminal. | Enter L if Vim shows the W12 warning. |
L |
Reload the file that tee just wrote to disk. |
Confirm the buffer and file are synchronized. |
:q! |
Exit Vim without attempting another normal write. | Use this after the file has been saved and reloaded. |
:w !sudo tee /path/to/file |
Save the current buffer to a different path with root permission. | Replace the destination with the required file path. |
:w ~/backup.conf |
Save a copy to the current user’s home directory. | Use the normal Vim write because the path is user-owned. |
:w !tee ~/backup.conf |
Save a home-directory copy through the external tee command. |
No sudo is normally needed. |
cnoreabbrev w!! w !sudo tee % > /dev/null |
Create a reusable elevated-write shortcut in ~/.vimrc. |
Run :source ~/.vimrc, then use :w!!. |
The main lesson is simple: a read-only error does not mean the long file in Vim is lost. Keep the buffer open, use :w !sudo tee %, reload with L when prompted, and exit with :q! after the file is synchronized.
💬 Comments