A second Windows account can be allowed to sign in over Remote Desktop without making it an administrator. The account needs permission on the host, a usable password, and a Windows edition that can accept incoming RDP connections. Adding it does not provide a second simultaneous desktop: Windows 11 client editions are designed for one interactive session at a time.
Quick answer
On the Windows 11 PC that will receive the connection, open Settings > System > Remote Desktop > Remote Desktop users, select Add, enter the second account, and confirm it. Or run Add-LocalGroupMember -Group “Remote Desktop Users” -Member “$env:COMPUTERNAME\rdpuser” in an elevated PowerShell window, replacing rdpuser with the local account name. The account must have a password. This grants that account permission to use the existing RDP session; it does not enable two users to work in separate sessions at once.
What “second account” means
There are two different requests that are often described as “adding a second RDP user”:
- Allow another account to connect: Add that account to the host’s local Remote Desktop Users group. The account can then sign in when the Windows host is available.
- Keep two accounts connected at the same time: This requires a multi-session host. A normal Windows 11 installation does not turn into a multiuser Remote Desktop Session Host by adding accounts or changing a local policy.
This guide covers both cases. Use the first option if one person at a time will use the computer, for example, two administrators taking turns. If people need independent desktops concurrently, skip to the supported multiuser options below.
Prerequisites
Make these checks on the computer that users will connect to, not only on the client PC:
- Windows edition: Incoming Remote Desktop hosting is available on Windows Pro, Enterprise, Education, and Windows Server editions. Windows Home can use Remote Desktop as a client, but it cannot host incoming Microsoft RDP sessions.
- Remote Desktop enabled: Open Settings > System > Remote Desktop and turn it on. Leave Network Level Authentication enabled unless you have a specific compatibility issue that requires a different configuration.
- Account exists on the host: The user must have a Windows account on the target computer or a valid identity supported by the host’s join configuration. Adding a name to the RDP permission group does not create the account.
- Account has a password: A local account with a blank password is normally prevented from signing in over the network by Windows local security policy. Set a strong password on the host and use that account’s credentials when connecting.
- Administrator rights for setup: Only an administrator can add another user to the local Remote Desktop Users group or enable Remote Desktop.
For local accounts, know the account name as Windows resolves it on the host. In a workgroup, a sign-in may need the form HOSTNAME\username or .\username. For a Microsoft Entra joined computer, use the organization’s supported sign-in format, commonly the user principal name. The correct form depends on how the PC is joined and how it authenticates users.
Option 1: Give a Second Account Permission to Connect
Use Windows Settings
Sign in to the host with an administrator account.
- Open Settings.
- Select System, then Remote Desktop.
- Select Remote Desktop users.
- In the dialog, select Add.
- Enter the exact account name and select Check Names if the button is available. Confirm the resolved account, then select OK.
- Confirm the account appears in the list and close the dialog.
The Windows 11 screens below show the Remote Desktop settings page and the account permissions dialog. They are real Windows screenshots published with this Windows 11 Remote Desktop guide.
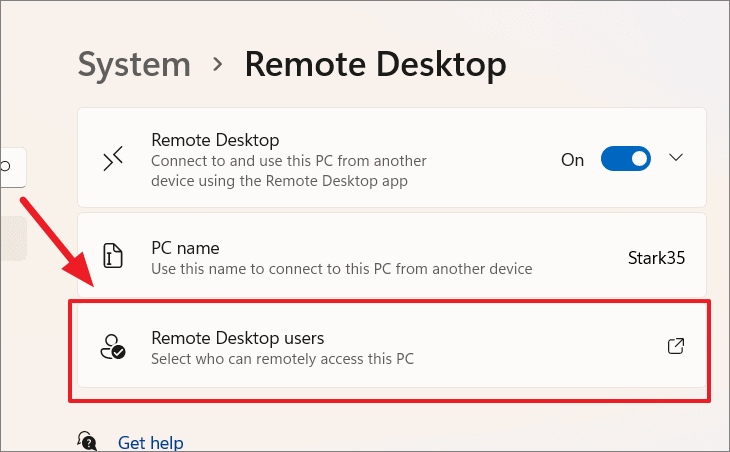
Remote Desktop settings and the Remote Desktop users link. Screenshot: All Things How.
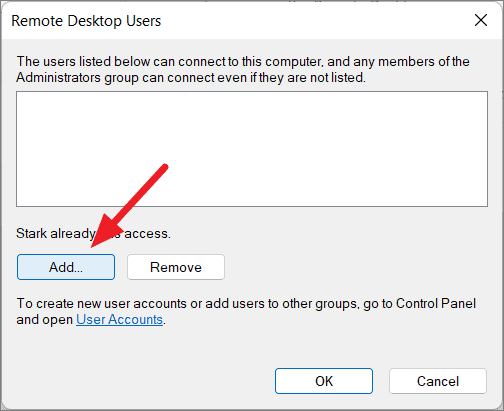
The Remote Desktop Users dialog is where you add a separate account. Screenshot: All Things How.
Administrators already have RDP sign-in rights by default, so they do not need to be listed in this group. For a standard account, adding it to Remote Desktop Users grants remote sign-in permission without granting administrator privileges. That is generally preferable to making a user a local administrator just to let them connect.
Add the account with PowerShell
On the host, open PowerShell as Administrator. Replace rdpuser with the actual local account name:
$accountName = "rdpuser"
$memberName = "$env:COMPUTERNAME\$accountName"
$groupName = "Remote Desktop Users"

$existingMembers = Get-LocalGroupMember -Group $groupName
if ($existingMembers.Name -notcontains $memberName) {
    Add-LocalGroupMember -Group $groupName -Member $memberName
}

Get-LocalGroupMember -Group $groupName
The membership check makes the example safe to run again if the account is already present. Confirm the output includes the expected host and account name before testing a connection.
If the account is a Microsoft Entra identity, do not assume that a bare email address will resolve in the same way as a local account. Microsoft documents adding an individual Entra identity using the AzureAD\[email protected] name form with the local group command on supported joined devices. Use the identity format appropriate to your join type and Windows version. Entra group membership has additional limitations for RDP sign-in; for a single user, adding the individual account is often easier to troubleshoot.
Test the new account
From another device, open Remote Desktop Connection (search for it, or run mstsc.exe), enter the host name or IP address, and connect. At the credential prompt, specify the second account in the format expected by the host. For example, a local workgroup account might use HOSTNAME\rdpuser.
Use the user’s Windows password, not a PIN, fingerprint, or other Windows Hello gesture. Those sign-in methods unlock a local session but are not generally accepted as the account password for a conventional RDP credential prompt. Keep Network Level Authentication enabled and use a supported client.
Option 2: Let Two Users Work at the Same Time
Adding a second account only changes who is authorized to use Remote Desktop. It does not increase the number of interactive sessions supported by the operating system.
On a normal Windows 11 client PC, there is one interactive session at a time. If another account connects while someone is already using that PC, Windows may disconnect or switch away from the current session and show a notice to that user. The two accounts do not receive separate, concurrently running Windows desktops on that same client installation.
This applies to Windows 11 Pro and locally installed Enterprise or Education editions. Windows 11 Enterprise multi-session is a distinct cloud-hosted offering for Azure Virtual Desktop; it is not a setting that can be enabled on an ordinary locally installed Windows 11 PC. Microsoft’s Windows 11 multi-session sizing guidance describes multi-session hosts in the Azure Virtual Desktop context.
The Windows Server licensing allowance for two remote administrative connections is also not a general-purpose shared desktop service. If staff need to use applications and desktops concurrently, deploy the Remote Desktop Services Session Host role and configure licensing for the intended users or devices. Microsoft’s Remote Desktop Services overview describes the session host, connection broker, and licensing roles. Each user or device connecting to an RDS session host requires the appropriate RDS Client Access License (CAL), as detailed in Microsoft’s RDS CAL licensing guide.
Avoid replacing or patching termsrv.dll, or relying on tools such as RDP Wrapper, to remove the single-session behavior. These are unofficial modifications to Windows components, can stop working after cumulative updates, and are not a supported way to provide multiuser access. For a supported deployment, use Windows Server with RDS or a properly licensed Azure Virtual Desktop configuration.
Troubleshoot a Second Account That Cannot Sign In
If the account was added but the connection fails, check the specific failure point rather than changing session-limit settings:
- Confirm the host is reachable and RDP is enabled. On the host, check Settings > System > Remote Desktop. From a client on the same network, you can test the default RDP port with:
A failed TCP test points to the listener, firewall, routing, or host availability; it does not prove that account membership is wrong.
Test-NetConnection -ComputerName "HOSTNAME-OR-IP" -Port 3389 - Verify the account name. Run
Get-LocalUserfor local accounts and useGet-LocalGroupMember -Group “Remote Desktop Users”to check membership. A typo or using the client computer’s account instead of the host account is common on workgroup PCs. - Check the password and credential format. Use the host account’s actual password. Try
HOSTNAME\usernamefor a local account if an unqualified username selects the wrong identity. - Check local policy. The user must have the right to log on through Remote Desktop Services, and must not be included in a policy that denies that right. Domain or device-management policy can override local group membership.
- Check account lockout and sign-in restrictions. Expired passwords, disabled accounts, sign-in hours, and account lockout can block a user even when they are in the group.
- Distinguish permission failures from the one-session limit. If one user can connect, but a second connection disconnects or replaces that user’s session, that is the Windows client session model. Adding more accounts will not change it.
Do not disable Network Level Authentication as a first troubleshooting step. First verify the account identity, password, group membership, and host edition. If a specific Microsoft Entra configuration requires a different NLA setting, follow the applicable identity guidance and understand the security tradeoff before changing it.
Use a Supported Multiuser Host
Choose the host based on how many people need active sessions:
- Physical Windows 11 PC: Windows 11 Pro, Enterprise, and Education client installations are single-session hosts. PowerShell can add accounts to the allowed-user group, but it cannot make a physical Windows 11 installation a supported multi-session RDP server.
- Concurrent sessions on Windows Server: Deploy the Remote Desktop Session Host role and an RDS deployment. Users need the appropriate Windows Server CALs and RDS CALs. The example below creates a basic single-server deployment on Windows Server for a domain environment.
- Windows 11 Enterprise multi-session: This is for Azure Virtual Desktop host-pool virtual machines with a supported multi-session image and the required licensing. It is not something you can install on, or use to turn into a multi-session host, a physical Windows 11 PC.
Example: Basic Windows Server RDS deployment
This example places the RD Connection Broker, RD Web Access, RD Session Host, and RD Licensing roles on one Windows Server for a small lab or initial deployment. Production environments often place roles on separate servers and require additional planning for certificates, gateways, availability, profiles, and capacity.
Before running it, prepare a Windows Server computer that is joined to your Active Directory domain, confirm DNS resolves its fully qualified domain name, and create a domain security group for users who should be allowed into the collection. Run Windows PowerShell as Administrator on the server. Replace every example name with your own. The script installs server roles and creates an RDS deployment; use it only on a server intended for this purpose.
# Run on a domain-joined Windows Server as Administrator.
# Replace these values before running the deployment.
$server = "rds01.contoso.com"
$collectionName = "OfficeUsers"
$userGroup = "CONTOSO\RDP-Users"
$licenseMode = "PerUser"

$ErrorActionPreference = "Stop"

Install-WindowsFeature -Name RDS-Licensing -IncludeManagementTools
Import-Module RemoteDesktop

$deployment = @{
    ConnectionBroker = $server
    WebAccessServer = $server
    SessionHost = $server
}
New-RDSessionDeployment @deployment

$licensingRole = @{
    Server = $server
    Role = "RDS-LICENSING"
    ConnectionBroker = $server
}
Add-RDServer @licensingRole

$collection = @{
    CollectionName = $collectionName
    SessionHost = $server
    ConnectionBroker = $server
    CollectionDescription = "Shared desktop sessions"
}
New-RDSessionCollection @collection

$collectionAccess = @{
    CollectionName = $collectionName
    UserGroup = @($userGroup)
    ConnectionBroker = $server
}
Set-RDSessionCollectionConfiguration @collectionAccess

$licenseConfiguration = @{
    LicenseServer = $server
    Mode = $licenseMode
    ConnectionBroker = $server
    Force = $true
}
Set-RDLicenseConfiguration @licenseConfiguration
The cmdlets create the deployment and collection and set the licensing mode. They do not activate the RD Licensing server or install purchased CAL packs. Complete those licensing steps in Remote Desktop Licensing Manager, and verify that the server can reach its license server before users rely on the deployment. Each user or device needs the applicable RDS CAL; the Windows Server CAL requirement also applies. Choose PerUser or PerDevice to match your licensing and deployment.
Use a domain group such as CONTOSO\RDP-Users in $userGroup, and add authorized accounts to that group. The collection configuration limits RDS access to that group. The ordinary Windows 11 Remote Desktop Users list is for authorizing individual connections to a Windows client; the RDS collection is the access boundary for this server deployment.
This is a basic single-server example, not a complete production architecture. Microsoft documents the deployment process and the New-RDSessionDeployment, New-RDSessionCollection, and Set-RDLicenseConfiguration cmdlets. Review the RDS deployment guide before adapting it to multiple servers or production use.
For Windows 11 Enterprise multi-session, use Azure Virtual Desktop with a supported Azure VM image and licensing. A physical PC running Windows 11 is not an AVD host, and the AVD multi-session image is not a feature that can be enabled locally with PowerShell. Microsoft’s Windows Enterprise multi-session FAQ states that Windows Enterprise multi-session is for Azure Virtual Desktop.
Summary
To authorize a second account on Windows 11, add it to the host’s Remote Desktop Users group in Settings or with elevated PowerShell. Make sure the account exists, has a password, and uses the correct credential format. This solves an access-permission problem only. It does not allow two people to keep separate RDP sessions active on a standard Windows 11 PC; use Windows Server RDS or Azure Virtual Desktop multi-session for supported concurrent use.
💬 Comments